
Tags
This time, lets look at the Pan Laws using Pro Tools as our base. This has been a bit confusing for some and in my opinion, one of the most unused things within Pro Tools. One of the reasons I wanted to write about this is because of the mention of Pan Law in my previous article about Dolby Atmos. For now, I will explain this in the stereo field, as to my knowledge both the Atmos Object and the surround Panner rely on the -3dB pan law which has an update here.
The Different Pan Laws
There are primarily 4 kinds of Pan Depths you will find in Pro Tools. (Go to Session Setup and you will see it as a drop down menu). They are:
-2.5 dB
-3 dB
-4.5 dB
-6 dB
The older Pan laws in Pro Tools were at -2.5 dB upto Version 8. The variable Pan Depths were introduced in Version 9 onwards. But what do they mean when it says these values? These are the meanings:
-2.5 dB Default in Pro Tools. I think it is also equal to what the Neve consoles had.
-3 dB Constant Power Pan
-4.5 dB The value on SSL Consoles. Was used as a Middle Range between Constant Power and Constant Gain.
-6 dB Constant Gain Pan
Why So Many of them?
That was a question I always had in mind. In my head, the understanding was that if you play the same sound from two speakers, it would go up by 3dB, as that was the value you would get in Acoustical Summing. So, in order for the pan to work, at the center point, it has to be -3dB so that it sounds at the same level as if it was just on the left or the right. But what was the use of -6 and -4.5?
For this, there are two kinds of Pan Laws. One is called Constant Gain and the other is called Constant Power. Constant gain is just that. As you move between left to right, the overall gain will be the same.
Constant Gain
Here is where we need to understand electrical summing. Earlier, we saw that for the kick to sound in the center when played from two speakers, it has to be -3 and -3 on Left and right. But in the case of electrical summing it has to be -6dB. Lets look at an example. Lets say the gain is G db. So, if it is only on left or right, it has to be G. While panning from left to right also, it has to be G. (Its constant Gain). If we were to express this, then lets say pan port is 20 percent from left. So, from right it will be 80 percent. Simply said, the calculation is:
GLeft = (20/100)*G
GRight = (1-(20/100)*G or (.8)*G
The general formula will then be:
GL=Percent*G
GR = (1-Percent)*G
If interested, you can find more calculations here.
Constant Power
Constant Power is needed because it will give you the perception of constant loudness while panning across. For this, the center has to be -3dB. As per the acoustic Addition. The reason for this is because when it comes to power, we look at root mean square of the gain. So, Gsquare = GLSquare+GRSquare. This is so because Decibel is a logarithmic value. So, at middle, it will be 1/√2 G. Converting this to, it will be log10 (1/√2) ≈ −0.15. Voltage gain is 20*.15 = -3dB.
Now that we are out of that, the mathematical expression for constant gain is:
GLeft =(sin(π/2)*Percent)G
GRight =(cos(π/2)*Percent)G
It looks a bit daunting? Dont worry! We dont need to be concerned with this. All this means is as we pan the power will be same. Look at the figures below (Courtesy of Stanford.edu):
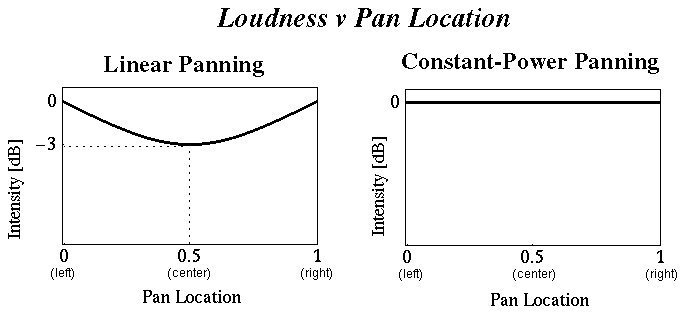
Pan-loudness
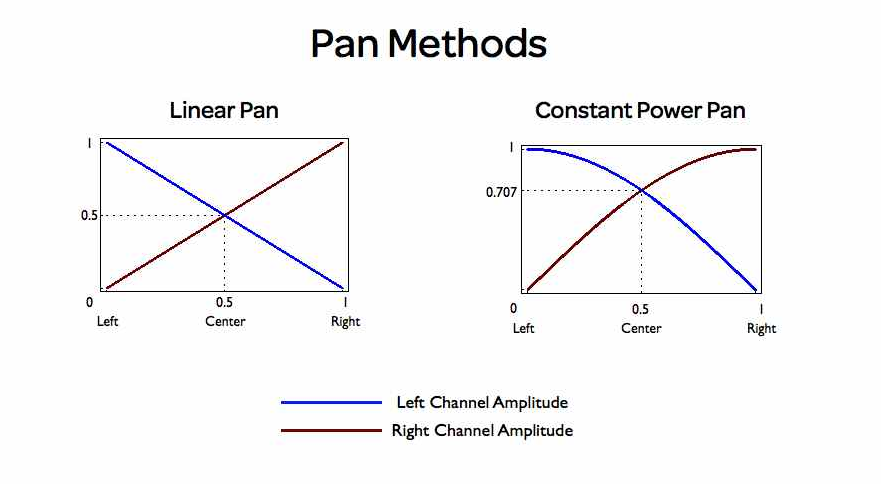
Pan Methods
If we plot all the Pan Laws in the -3dB law, you will see it as:
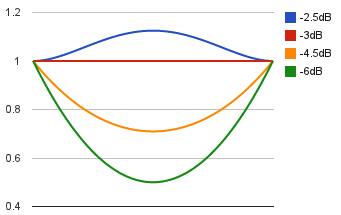
Constant Power Plot
Enough with the maths how do we use this?
While we saw the mathematics, lets get creative with this now. The purpose of this is based on what the final delivery will be. There are 2 cases:
1. If your delivery is going to be summed to Mono, ie both channels will be sent to a mono bus, then you need to use the -6 dB Pan law.
2. If there will be 2 channels, but want a signal to be in the center, then you use the -3dB Pan law.
What about -2.5 and -4.5 Pan Law? -4.5 was used on the SSL consoles. The idea was that since these consoles would be put in a very acoustically treated and calibrated room, the issue of acoustic summing will be lesser than 3dB. This was more like a best of both constant gain and constant power. But, there is something else here.
If you have a compression on the Main bus, then look at what happens when you are on this mode. The compression acts differently on the channels! This means if the signal is on the center, it will hit it differently than if you use constant gain pan! It offers a much better depth to the mixes. The reverse is also true. If you are on the 2.5 dB Pan mode, then that will result in a much tighter mix. Interesting isnt it! In the video below, Audio 1 is routed to a stereo Aux track. The Stereo Aux track is routed to a Mono output. You can now see the effect of the various pans happening. If the pan law is set to -6 dB, then there is no change in level in the Mono track. The other laws, will change as the plots I did above.
Pan in Surround Field
Now, we know that a constant Power pan law is needed to maintain loudness, this is used prominently in a surround pan law. Between speakers, it implements a constant power law. This is extrapolated when you pan between speakers in a surround field. But again as I mentioned in this blog, we have to be aware of the surround pan in between a speaker and an array.
Pan In Dolby Atmos
Now that we have seen the constant power pan law, imagine taking that method and panning between every speaker the sound will travel. So, if you look at the figure below, and assume you are panning from LS1 to LS 9, then from LS1 to LS2, LS2 to LS3, and so on will follow the -3dB Pan Law! That is far accurate than panning from the Left to Left Surround (The Red Speakers from LS4 to LS9). Now, it is this accuracy that will be closely maintained when the down mix happens.
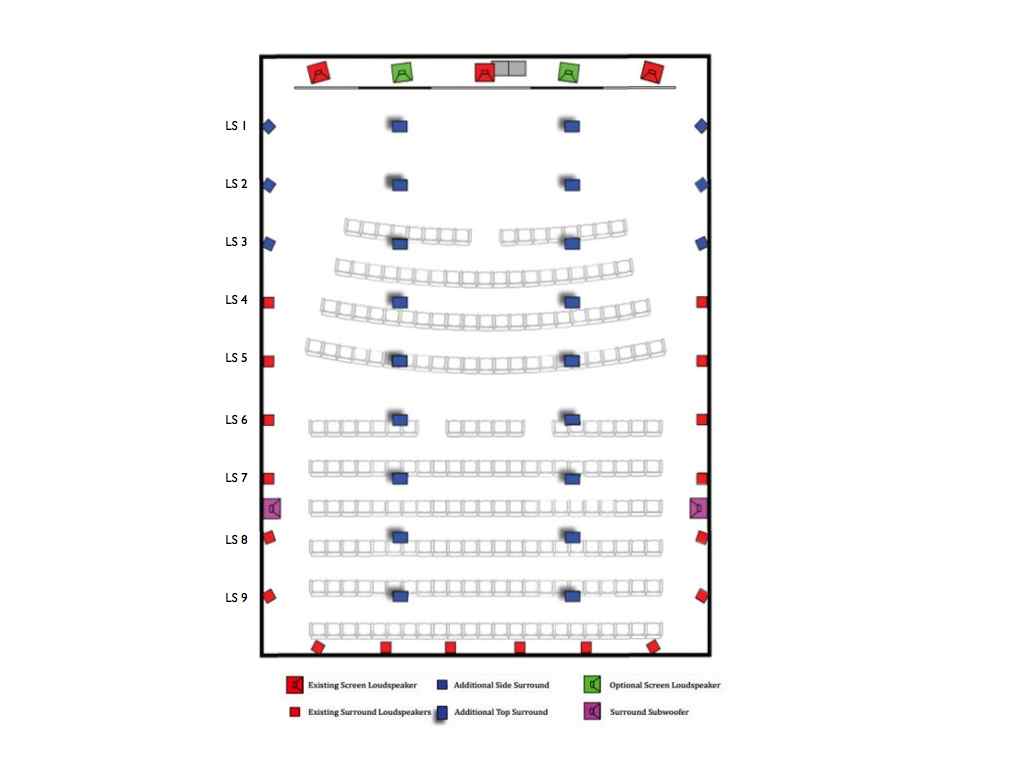
Atmos Speakers
Interesting Technique with Surround Pan
if you have Pro Tools HD and are doing a stereo mix, here is an interesting trick that you can use. Lets look at parallel compression. The way this is achieved is usually with a copy of the signal sent to another auxiliary and compressing that heavily and adding it back to the main signal. Here is an alternate way to do it. Look at the panner below.
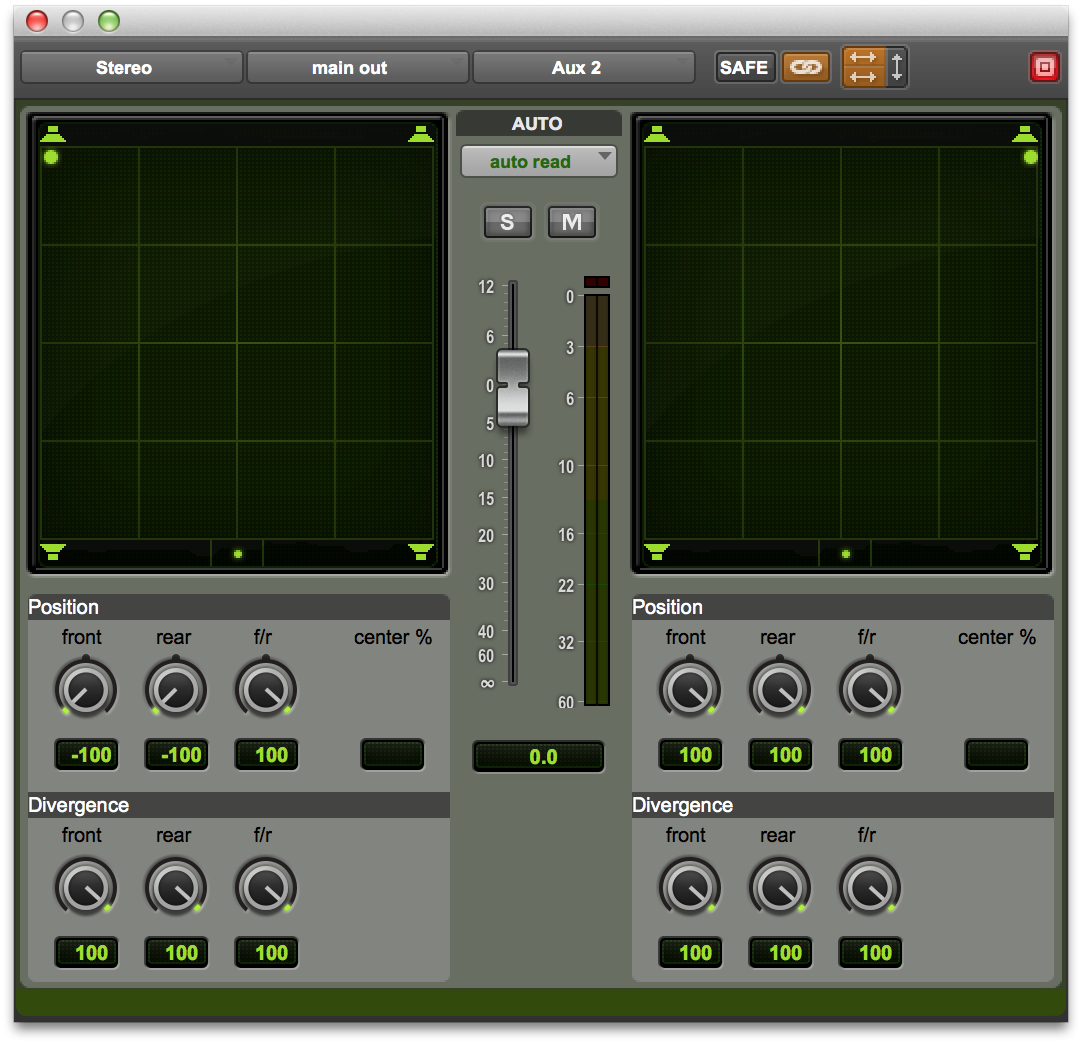
Parallel Compression Trick
If you assign the Left and Right sub path to the main output, and the Ls and Rs sub path to an aux with a compressor, then simply by moving the panner, you can achieve a level of parallel compression not conventionally possible. In addition, you can experiment more by opening divergence individually between channels and changing pans too!
Now, instead of parallel compression you can have a reverb on the Ls Rs sub path and you have an interesting way of sending reverb following the Pan Law! This is quite unique and offers a lot of creative possibilities. Use all the imagination!
I hope this has been an interesting read and is useful in your mixes.
-FM

Brilliant parallel trick with the subpaths. Thanks a lot. I’ve been loving your blogs. Cheers, Dan
Thank you Dan! 😊
Pingback: Dolby Atmos Pan Law Formula | Film Mixing and Sound design
Hi! Sometimes the TV network asks for stereo full mix or music/fx stems, which you recommend -3dB as pan law, but they want dialogs and VO mono which would require -6dB law. Do you need to change the law before exporting those and do so separately? I used to simply route them to their separate tracks and record from start to finish, each in their own “width”.
If you sum them to mono as a single track then yes. Else if the mono is split into 2 channels then no.
So I’ve been doing it wrong all this time… thanks for the tip!
Hi FM,
Unfortunately, the equations for constant power panning are completely incorrect. sin(pi/2) = 1.0 and cos(pi/2) = 0.0 so according to these incorrect equations, GLeft is Percent*G and GRight is always 0.0, assuming that (Percent)G means Percent*G. Furthermore, according to these equations, at zero Percent (panned fully left), there would be no sound, and when panned fully right, there would be full sound out of the left channel and still nothing out of the right channel.
The correct expressions are:
GLeft = cos(pi*(p+1)/4) * G
GRight = sin(pi*(p+1)/4) * G
where p varies from -1 (left) to +1 (right). Alternatively,
GLeft = cos(pi*Percent/200) * G
GRight = sin(pi*Percent/200) * G
where Percent is measured from left and varies from 0 to 100, not 0 to 1. If one used Pan from 0 (left) to 1 (right):
GLeft = cos(pi*Pan/2) * G
GRight = sin(pi*Pan/2) * G
Regards,
Dave
Thanks a lot Dave. You are right. I will update the article.
Pingback: Pan Laws හඳුනාගනිමු – AudioHub
Pan Law is something you set as preference before you start mixing, but it actually has no impact on sound or mixing in general whatsoever. The phase relationship/mono compatibility doesn’t depend on the pan law, but should be constantly checked through appropriate plugins and it depends on the way you mix and pan things in the stereo field or how you use stereo spreaders or not. At the end you should always move faders for correct volume movement and this itself annihilates whatever pan law you chose at the beginning.
True. Although I was referring to the various reasons for the Pan law. As you said it isn’t about mono compatibility or phase at all. Especially since it is just a gain change that happens between channels.
Yes, but at the end Pan Laws make no difference at all. Just go with the default on your DAW. Cubase for example defaults to equal power and it works perfectly, I never changed it and no need to do it.
Cool!!
P.S.: once you set a certain pan law at the beginning, you should never change it anymore, because otherwise you make a mess in your mix and of course you create different balances depending on which pan law you choose AFTER you have mixed. But that’s a mistake.