
Tags
Today I thought I would explain how we had plans of prepping the session for the mix. Remember, these will change later on as we delve deeper into the mix but thats the fun right? Where we think we have a plan and it changes! (Not unusual though!)
The Thought
It is important to know the thought behind preparing a session for mix. Usually we get the sessions from the sound designer and the Music Composer and then we re-route it to our comfortable bussing structure that we as mixers are used to. For example, there will be a dialogue Buss, Dia reverb busses, Foley, FX, Ambience, Score, song and crowd. Of late the FX and foley are also split into more wider stems like FX, Design 1, Design 1, Footsteps, Incidentals (taps, doors, cloth etc) and so on. This time too, Justin and I followed the same principle, but we had also come up with some ideas that are unique to this. I think we are the first to figure this out, but then if there is someone reading this who has done this before, then by all means this is a coincidental thought and not plagiarism!
The Mix Room
What is very unique about Futureworks Parel is that it is a Premiere Atmos Mix stage. The Only one in India and the first in the world. Now, what this means is that it has 5 screen speakers instead of 3. (You can read more about it in this blog post.) This is the layout in this case.
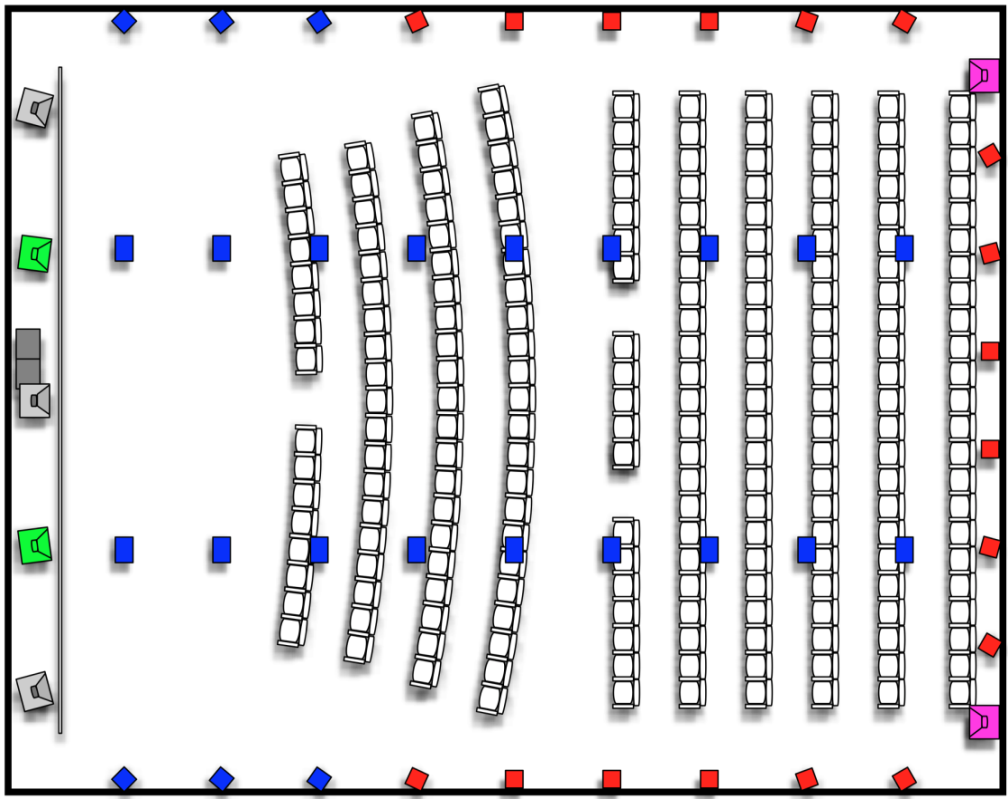
As you can see in the above picture, just behind the screen we have Left, Center Right in gray color and two more in green color which I will call Left Center and Right Center. Does this screen layout look familiar? If yes, it is because this is similar the Screen layout of the SDDS format. It is a very accurate representation of the screen and gives more resolution to the pan. But there are two issues with this.
1. The green speakers (Left Center and Right Center) are objects and not part of the bed.
2. The SDDS format has only 2 surrounds while Dolby Atmos has 4 surrounds (Left Side, Right Side, Left Rear and Right Rear.)
So, my thought was how can we combine both the SDDS for screen and 7.1 HD for Surrounds into one single Pan motion in Pro Tools? Thats when a unique thing in Pro Tools struck me.
11.1 Pan in Pro Tools
Dont confuse this with the 11.1 in Auro 3D. That is 2 sets of 5.1s placed one above the other. (Actually it is a 5.1 and a 5.0 above it with the Voice OF God or VOG channel in the middle.) The 11.1 in Our Mix session for Bombay Velvet is different and not standard. It is laid out as Left, Left Center, Center, Right Center, Right, Left Side Surround, RIght Side Surround, Left Back Surround, Right Back Surround, LFE that makes 9.1 and then 2 overheads that makes a total of 11.1. So, we have a unique Set of resolution. How did we create this?

The first idea I had was to have the SDDS and 7.1 formats and then cut tracks into whichever is needed. But Soon I realised thats a lot of additional work with no benefit. Then I saw the option of FMP in Pro Tools.
What FMP is is Follow Main Pan. This is part of a Send and what it does is if you have a pan in an audio track, it will make the aux follow the same pan. Then it struck me that if i create all tracks with the main output to SDDS and also have a send to 7.1 HD with FMP on that send, this means when I do a pan in the main pan, it will be simultaneously sent to the bus.
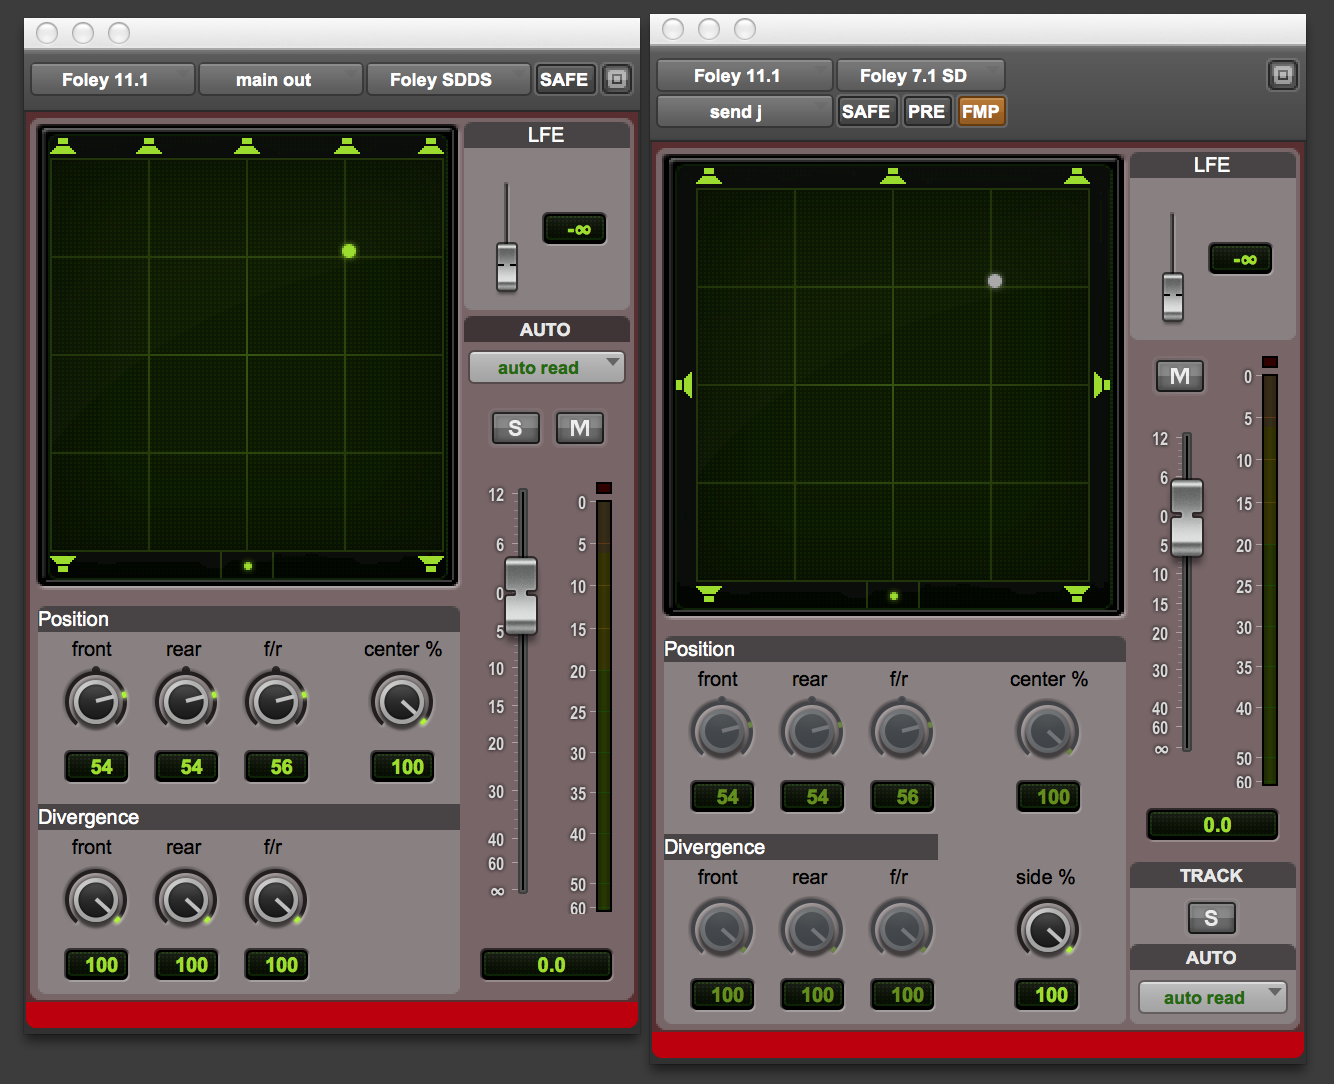
Combining the different 7.1s
In the above Picture, the Left Pan window is the main track output and the Right Pan window is the send with FMP on the top enabled in Orange. This means as you can see, any pan position in the main output is reflected in the send too, So, my next step was to make a set of Auxes that Route the L C and R of the main output to the L C R of the Bed. I would then discard the surrounds of that and instead use the surrounds of the send to the bed surrounds. (Note that the send is Post fader and also at unity so my levels are not changing.) My next step is to create a subpath for the Lc and Rc and route that to an object that is panned to that position using the atmos panner. This is how a template would then look.
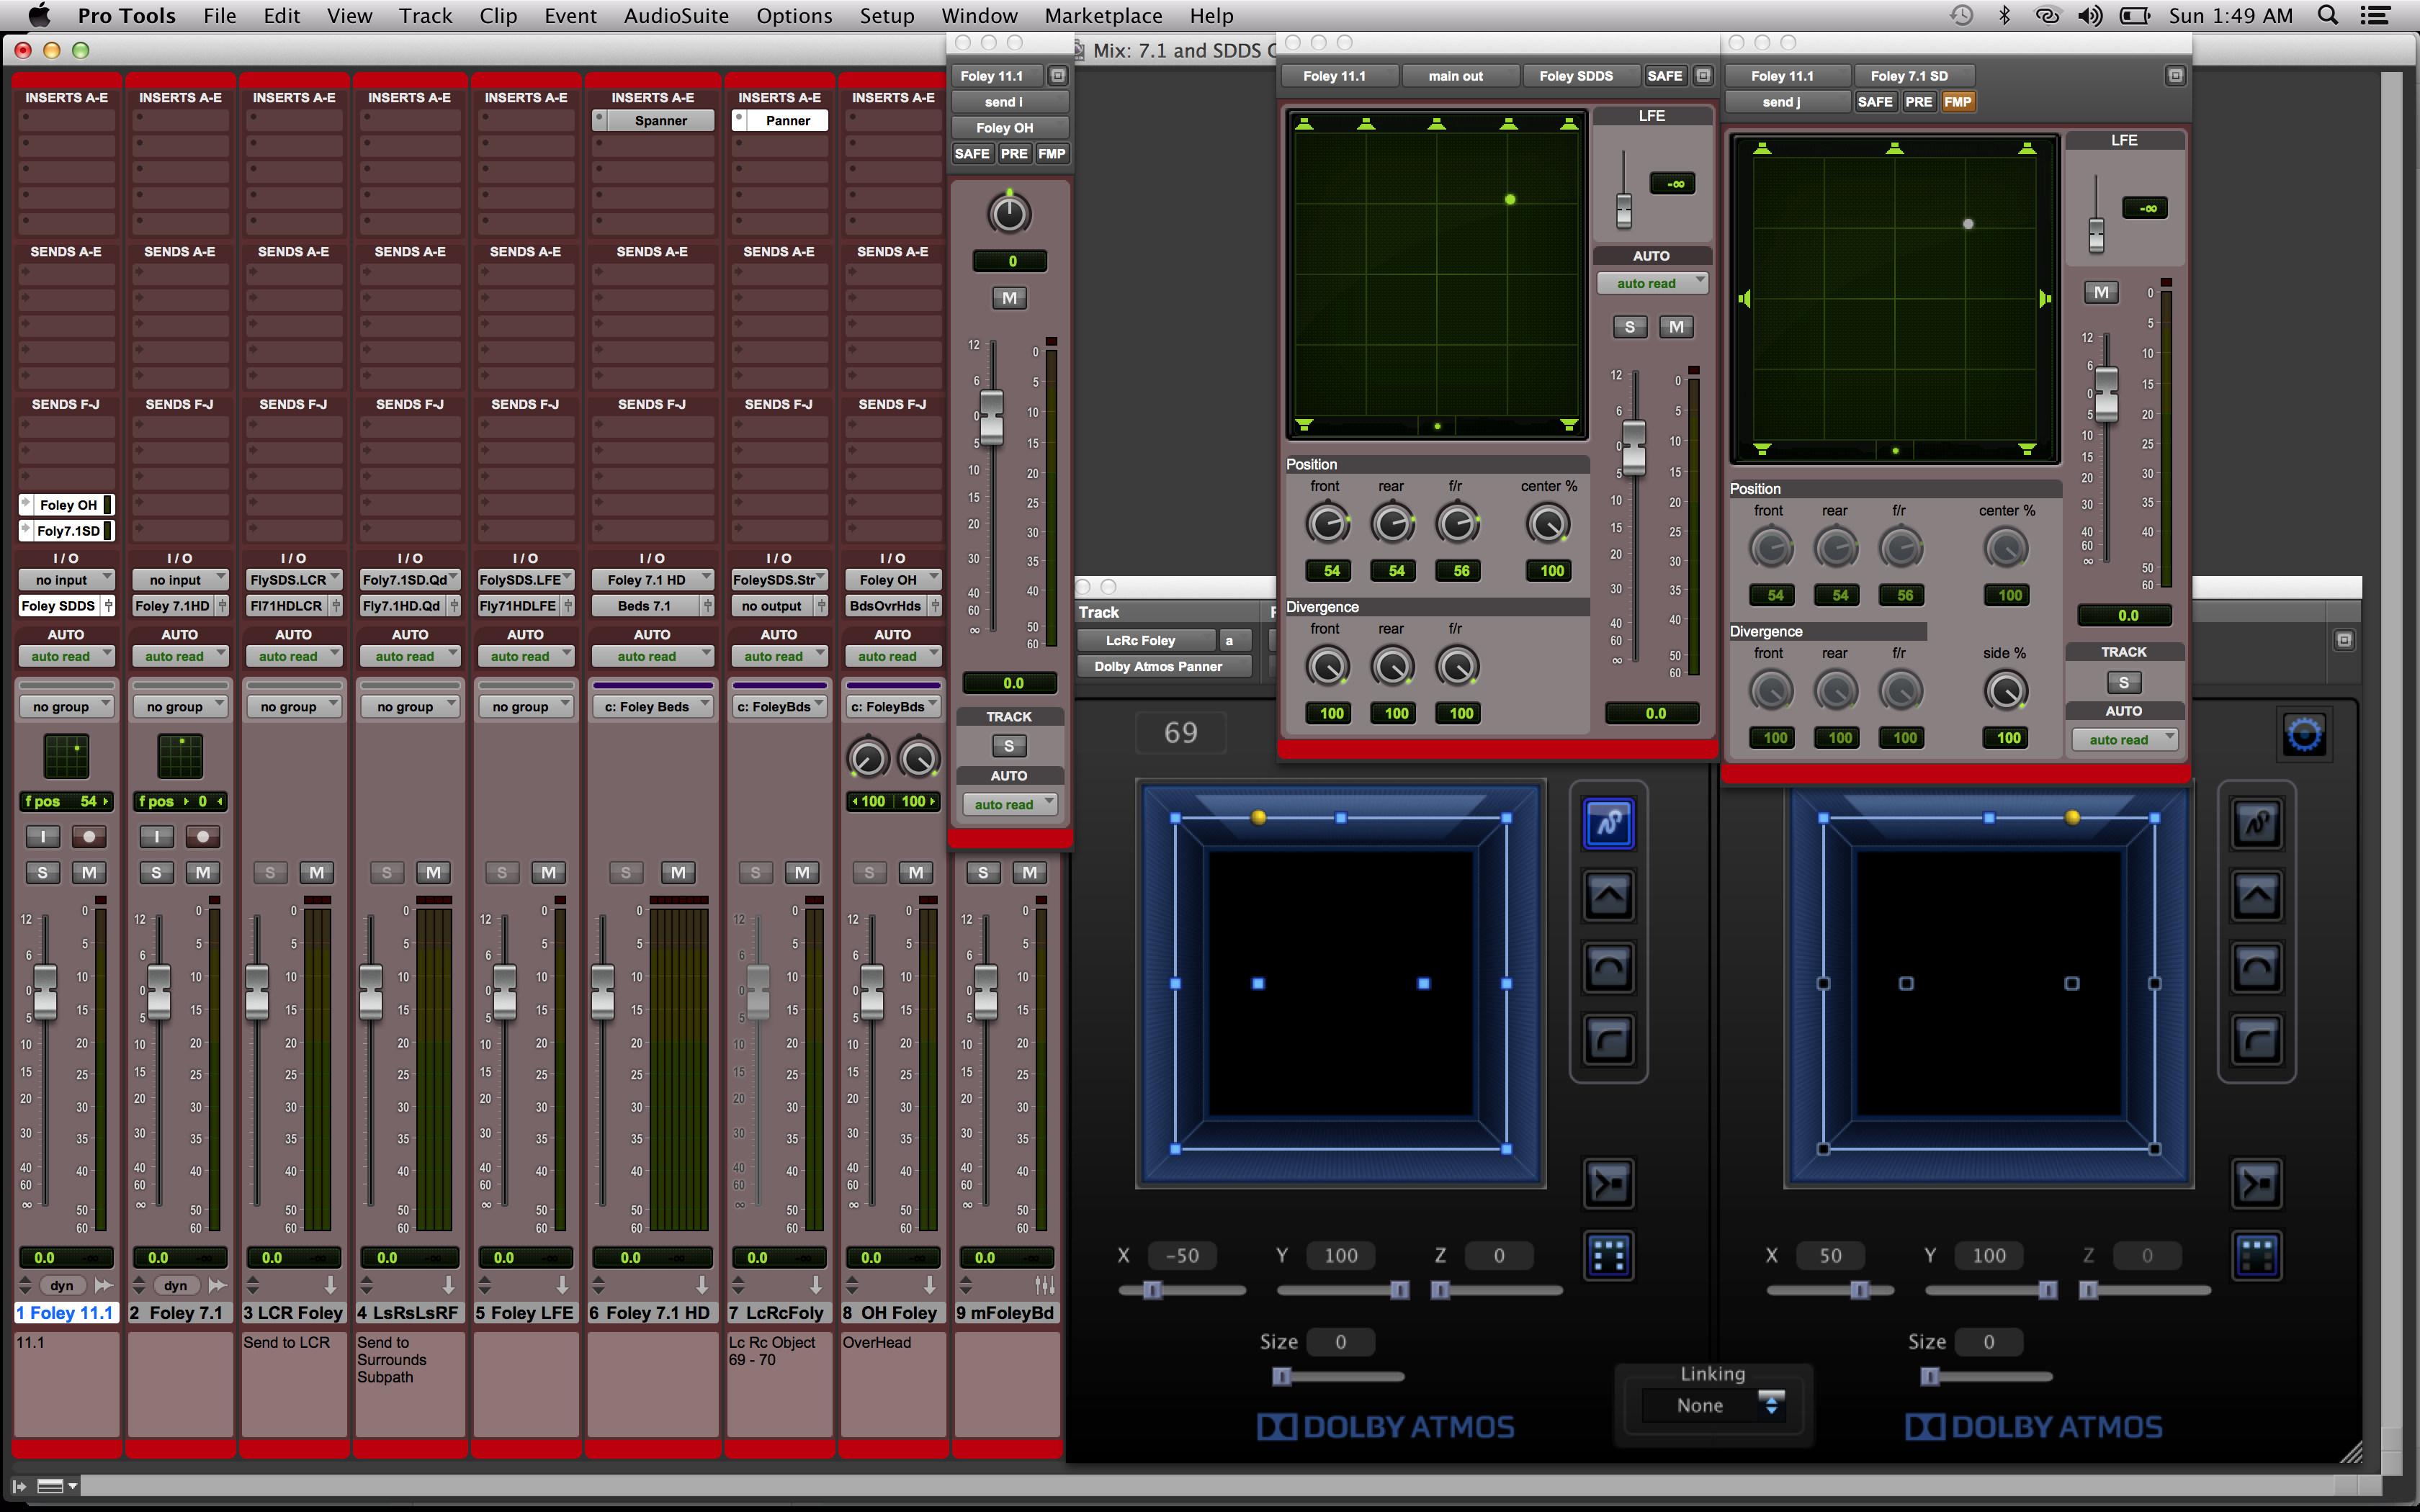
In this, if you see, Track no 1 is the main audio track routed to an SDDS output format. Track 2 is a routed to 7.1 HD in case we need that. Tracks 3, 4, 5 and 7 are what split the outputs. 3 and 4 combine to give the bed. Track 7 is the Lc Rc Subpath of the SDDS which is panned with the Atmos panner to those positions. Although it looks complex it really isnt once you have these auxes in place. Then anything will be routed to this and will be far more easier to pan and achieve the changes which previously wasn’t possible at all. The biggest strength that this method has is that when you pan beyond the center line, the audio no longer is removed from screen, which you will remember is a challenge from 7.1 HD.
I will leave you with this one technique for today. I think it will take some time to get this but once you do, you will find how useful it is.
Till next time! Have Fun!
-FM

Reblogged this on Film Mixing and Sound design.
Pingback: Bombay Velvet – Effects, Ambience and Foley Mix | Film Mixing and Sound design
Hey Pablo,
I’m a humble re-recording mixer and sound designer in Melbourne, Australia who only works in 5.1 but I love Atmos, I’ve sat in on one Atmos mix and have seen a few movies here in Atmos. LOVE this blog post. Do you apply this method a lot in you mixes? Does it all downmix well?
I’ve been loving what Pro Tools Expert has been sharing of your posts. I’ll be definitely visiting your site more often. Thanks for you willingness to share.
Benni Knop
Thanks! But my name isnt Pablo! Pablo is another person who was commenting on my blog. I have been mixing only 2 films a year now. And yes this downmixes quite well. In fact it is not possible to tell the difference at all!
Apologies for the name mix up Sreejesh! Brian was in autopilot. I was really surprised when I sat in on an atmos mix how good the 5.1 downmix was. They were obviously not using this technique. Thanks again for sharing.
This isn’t a common technique at all. I came up with this because the theater had 5 screen speakers. Not every place has that. 😊
Hi Sreejesh , could you kindly clarify few things that is hard to find on internet (seriously hard to find as of this date). 1. Minimum room dimensions for Dolby certification. .Do i really need a Dolby certification for mixing Atmos. Do i need a RMU unit and what other minimum hardware required !! Can I release Atmos mix without dolby logo or is it a must to have a license and logo. Can i publish dvds with 5.1 mix without dolby log on it? I know it sounds like am writing a mail to Dolby but they seem least responsive. Hope you cud shed some light . Tnx in advance.
Hey Amit,
It would still be better to write to Dolby depending on where you are. Some of the details I have are:
1. Room dimensions
The area shuld be >45sq.m. & Volume >150cubc.m.
LR angle at mix position (which is atleast 5m from the screen speaker) should be 45deg+/-5deg.
2. Yes. To release content in Atmos it has to be a certified room with the RMU.
3. You will need an HDX 2 with 2x HD Madi IO for full channel count.
4. You need license for the plug in to work. They will then provide the Logo.
5. DVDs need to be dolby or dts encoded. You will have to get licencing for either.
Thank you so much for the quick reply.. this cleared up the most important questions i had. Just a little more on DVD authoring. Am i wrong in saying” the dolby encoder fee is paid when i purchased the editing software which includes exporting a video clip with 5.1 sound.” What if i publish dvd without the dolby logo on it, just the audio-visual i created with my software. Do i still owe dolby!! I know i sud be asking dolby these things but had they been so generous like you in sharing information and knowledge I would not have bothered you. 🙂 Tnx again for you replies and posts, wish you all success in life.
Unfortunately I am not entirely sure on that aspect of the work flow.
It’s a shame you do1;782n#&t have a donate button! I’d most certainly donate to this excellent blog! I guess for now i’ll settle for bookmarking and adding your RSS feed to my Google account. I look forward to new updates and will share this website with my Facebook group. Talk soon!
Thank you very much Retta. That is such a kind thought. The idea I have is to always keep this blog free for any one who needs information. Hence there are no Ads or subscriptions. Thank you for sharing this blog.
Hi Sreejesh, thank you for your excellent post. I’d like to ask you if, in Pro Tools 12.8 or later, there’s a trick to automate a pan rotation of all the objects together at the same time, for example to follow the camera motion, instead of automating the rotation of any single object at a time. Thank you very much in advance.
Hi Gabriel. If you are talking of a spanner kind of workflow it doesn’t exist.
Thank you for your quick reply. Yes, that’s exactly what I meant.