
Tags
In this final instalment, lets look at the Mastering process for Dolby Atmos during Bombay Velvet. The Mastering and workflow help was given by Bharat Reddy and Dwarak Warrier from Dolby India. Dear friend and the resident Dolby Jedi Masters! This step is very little documented online and I will try to explain it as detailed as I can. It would help to have a look at the workflow diagram and the atmos format I have mentioned.
Mastering
One thing that is different in a Film mastering compared to mastering songs for audio is the meaning of the term itself. In the Mastering process for a CD or iTunes etc, great care is taken to ensure the different songs are similar in levels, the dynamics are clean, the song breaks are ok. There will be a master compressor, Limiter, EQ, etc, and many times, the song mix will sound different after mastering. None of this happens in a film mix master!
The reason I mention this is because I was asked quite a few times as to what mastering plugins do I use, what compression is used during the final master etc. The reason is that Film Sound is spread over a very long period and so the mix itself is done to sound the way it is intended to sound. There is no final overall glazing process that I use. I am not sure if that is the case worldwide but I would definitely think so. Any compressor or limiter would be in chain during mixing itself.

RMU Back Panel
Preparing for Mastering
For the mastering, the sessions are prepared with all the start marks and first frame of action (Commonly called as FFOA which stands for the first frame of the reel where the movie starts. It is 48 frames after the beep) and the Last frame of Action (LFOA). Once these are done, the timecodes are entered into the RMU’s (Rendering and Mastering Unit) interface. The control is via a web interface on the RMU itself. Once done, the playback is started 15 seconds before the beep. the reason is to also have a buffer for the file while doing overlaps. This time, since we were running two systems in sync and didnt have an additional system to record the Atmos Printmaster, the final atmos mix was recorded only on the RMU. Simultaneously, the downmix is recorded onto a separate recorder in 7.1 from which we created the 5.1.
The Mastering Process
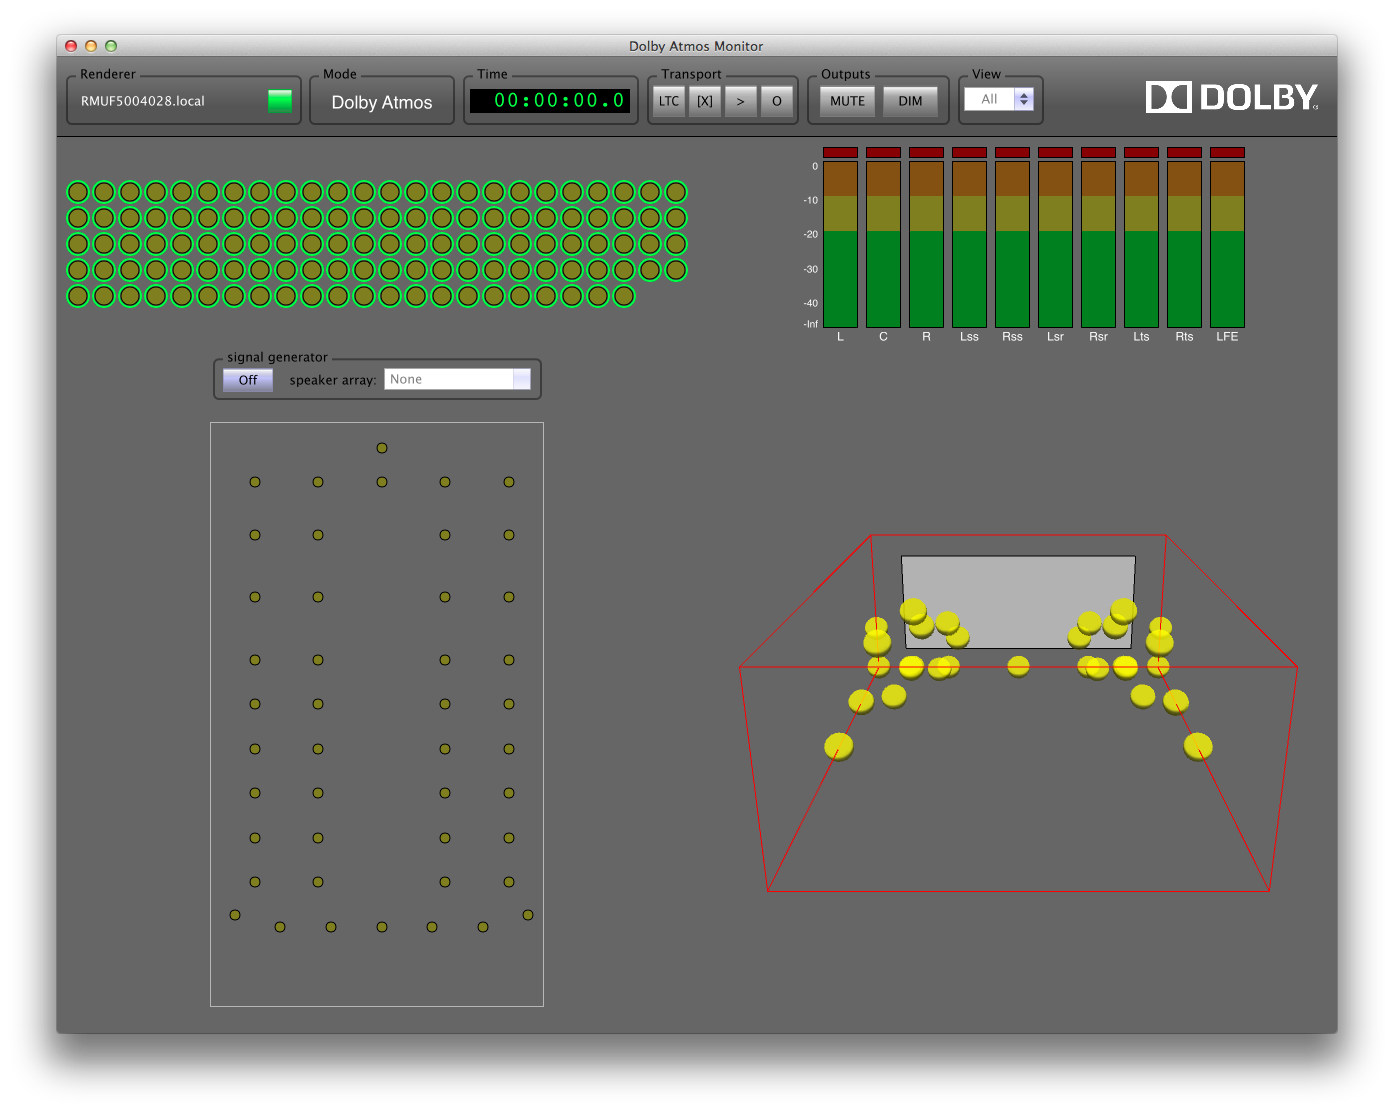
The Mastering Process involves the RMU recording the mix that we send to it via the 128 inputs on MADI. The process is done reel wise. Basically we run the mix and the RMU records.

The Transport section that you see is only active during mastering. The RMU requires LTC (Linear Time Code) for sync and mastering. Without that, the mastering wouldn’t trigger. The Web interface on the Mastering unit has the option to show where the files are being recorded to. It creates 48kHz and 24bit .wav files. The first 10 are labelled as the beds and the remaining are the objects. So, what is created after a recording pass is :
Ten mono .wav files, which make up the 9.1 bed
One .prm and one .wav file per object
One dub_out.rpl file
The dub_out.rpl file is basically an xml format file that has the details of all the associated wav files that are recorded. The .prm file contains the panner automation that we make on the plugin. This is also recorded and each object will have its associated prm file.
The Encoding

Atmos DCP Process
Once the Mastering is done, it has to be encoded into the DCP. The DCP that is made for atmos has some requirements. The Original fils comes from the DCP package that contains the 5.1 mix. Once that is made, the file issent to the dolby consultant with a KDM. KDM stands for Key Delivery Message. It is a license file that specifies the limitations of an encrypted file like when should it play, which theater it should play etc. The KDM is provided for a particular reason. When the consultant gets the DCP with the 5.1 embedded, they have to unwrap it, and add the atmos tracks into it. At this stage, there is one step that is done. Once the mastering is done, it has to be encoded into an MXF format. It is this MXF that is added into the DCP. But, the DCP is always made as a First half and second half each of which is an individual clip. How is it that the atmos that has been mastered reelwise converted into this?
There is a tool that is used which can match the Beep and also “stitch” the multiple reels into a single first half and second half audio. One of he biggest issue is usually sync. The Atmos encoding method allows for the tracks to be slipped as they have buffers to do so.
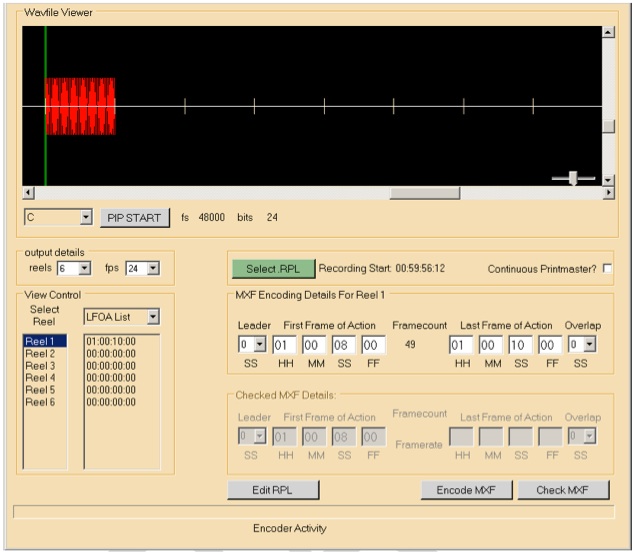
Atmos Tool (Image taken from the RMU)
At this stage, there is one important thing that needs to be considered. It is called overlaps. An overlap is basically any music or sound that extends beyond a reel and needs to be taken into the next reels beginning. This is usually music or the tails. Now, the issue with the digital format is it is sample based. If there is a cut that is made on a sound that contains low frequency then you will hear a click oat the reel change. To prevent this usually the score is ended before the reel ends or has a highpass that can be run at the very end on the transition.
So, once the reels are stitched, the atmos tracks are added into the DCP. The DCP has a naming convention that is followed.
Naming Convention
The DCP created by the Atmos encoder is a SMPTE standard. The usual standard followed by Qube or Scrabble is an interop standard although there is talk that the SMPTE will be the standard for DCPs in the future. You can read more about it here. Once all of this is done, we have an Atmos Package that can then be played back in theaters.
This concludes the entire workflow that was used during the mix in Bombay Velvet. I hope you had a great time reading it as I had mixing it and documenting it. I hope it was useful for all of you. Here’s wishing to great soundtracks and techniques and more importantly learning and sharing. Please do watch it in the theaters and let me know your thoughts.
Till next time, Enjoy!
-FM

Hi, congrats to the whole sound team of BOMBAY VELVET. Thank you so much for sharing your knowledge and am pretty sure I will be returning to it for future ref. The most useful thing I have ever read about the journey of Mixing from Beg. to End in ATMOS format. The great 10 episodes article is Invaluable and inspiring. I just love these kind of behind the scene in Movie making When it comes to Mixing. It just gives me an idea how others work. The most important thing is the way you explained and presented each stage of mixing briefly from start to end in the middle of such busy sessions of mixing is quiet impressive. Keep them coming. Hoping there will be something similar covering the Sound Design for films. I wanted to post the comment after watching the film but I cd not because I am quiet busy in mixing. Certainly I will come back to you after watching the film. Finally that was brilliant in depth journey you made all to travel along with you.
Hi Radha Krishna. Thank you so much for these kind words. It really is very encouraging to read such comments. I tried to make it as simple as possible in this. I didnt write a lot about the sound design because it was done by Kunal and I didnt want to write about something that I hadnt directly done. I have written about all he did in the design process through out and in pieces, but yes not as a separate post in Sound Design because the journey was about mixing and I didnt want to side track from that. 🙂 Thank you again for reading the blog. All the very best!
Hi! I’ve been reading al your posts about Dolby Atmos.
I trying to figure out if Atmos is an option to consider for my next documentary (it will be played in a cinema that has a Dolby Atmos system).
It’s a documentary on a very small budget and I will be doing the post-production myself. I use a 2x Intel xeon i7 workstation with 32gb of memory. For editing I use Premiere Pro CC and use audition CC and iZotope RX4 for the sound edit.
Now am I correct that buying ProTools wich has the Dolby Atmos Panner plug-in is not enough to get this to work? Cause I also read something about needing a Dolby’s outboard Rendering and Mastering Unit (RMU), is that a must? It sounds expensive, I tried google, but couldn’t figure out what it was.
If just the ProTools software would do the trick then I’m still concerned about the DCP export. I now use wraptor dcp in Premiere with their media encoder, wich works perfect, but I now read in your post that it needs a workarround with other programs to get it to work for Dolby Atmos:-) Am I correct?
Anyway, do you think I stand a change of getting this to work on a small budget (meaning, I would only have to buy ProTools 12 and be okey)
(I will be able to testrun the final film in the cinema as many times as I want, they upload the test DCP for free for me)
Thanks for your time and great blog!
Actually you won’t be able to do an atmos mix if it isn’t an atmos studio. The mastering happens only in the dolby unit called an RMU. And only Dolby or approved vendors can make the DCP for atmos. No one else can. So I think you will need to approach an atmos facility to mix.
Hi Filmmixer,
Thanks for the quick replay!
That’s bad news, haha. But I kinda expected it.
I’ll keep following this blog, you are very in depth!
Keep it up!
Perry.