
Creating Room Tones
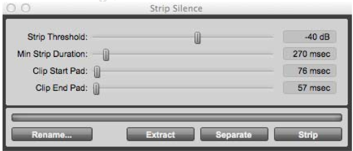
If you are doing a sync sound movie, it is very important to have a room tone for smoothening fills and gaps. It is easy to do this if there is a room tone that is recorded. But many times, it becomes necessary to create room tones from the existing dialogue track. If the dialogue has a lot of gaps, and has room tones in that, here is a quick way to get the room tone in Pro Tools. Import the entire clip into the session somewhere after the end of the reel. Select the whole track and open the Strip Silence. (Command+U). In the window, Set the threshold and duration looking at the track in question. Usually we go to strip to remove the blank spaces. Instead, use Extract to extract the blank spaces. Now, you will get a track with all the dialogues removed and just the room tone remaining. The challenge now is to join all these clips together to create contiguous room tone. The fastest way to do that is to select all the clips we just got, go to the clip list, and click and drag the clips that are selected there onto a track. But before you do that, make sure that the timeline drop order (found on the menu in the top of the clip list) is set to left to right. What this does is allows you to drag a bunch of clips onto a single track. If it is top to down, the clips get split onto multiple tracks.
Once you do this, you will have all the clips in one line set back to back! Just quickly listen through, do the crossfades and you have the room tone!
Aligning Clips
When aligning clips for sync or phase correction, highlight the clip you need and use Control and (+ or -) to nudge data within the clip selection. This is also useful for ambiences when you have the length selection made.
Noise Reduction
When doing noise reduction using say C4 or something like XNoise etc. make sure the handle length in the Audiosuite window is long enough to say 5 or 8 seconds. The advantage is if there si a dialogue edit, then you cal always peel open the dialogue clip to include or remove as needed.
Window Configurations
Use window configurations to open up a set of frequently used plugins. From Pro Tools 10 onwards, it is possible to have multiple audio suite windows open. The plugins I often use in Dialogue Mixing are C4, Q10, Sonnox EQ. So, I have these 3 plugin windows open. (Use Shift and click on the plugin in the Audiosuite menu to open multiple audio suite plugin windows.). The master track has these plugins in the order of EQIII, Q10, C4, Q10, Sonnox. These are all deactivated. When I encounter a noisy section, I first see if there is annoying whistle frequency. (This is a term I use myself for convenience. It just means any frequency that is bumped up and constant.). I use the EQIII to find the whistle frequency, bypass it, and fine tune that frequency in Q10. (I don’t always do this, and can very well just handle it with Q10, but sometimes I prefer to use this method.) Then I do a C4 to suppress the noise and then use the Sonnox to make up for the lost frequency. Once done. I have the chain of Q10, C4 and Sonnox. I then proceed to open the window config (You can make it by going to Window -> Configurations -> New Configuration and naming it to what you want. In fact you can also import window configs from one session to another making this a very powerful feature. )
I then copy the plugin parameter from the inserts and paste it onto the Audiosuite window in the order it appears on the insert track.
Reverb Sends
Its much easier to work with the reverb sends set to 0 than -infinity. The reason is that the only faders you need to change are the aux faders that have the reverb plugin. The others are sending full signal level.
Scrubbing for Clicks and Pops
Sometimes, it is necessary to draw the waveform to remove clicks and pops from the clip. Before you do this, it makes life much easier if you enable Edit Insertion Follows Scrub / Shuttle in the Preference -> Operations page. The reason is that when you scrub the track trying to find the click, and you leave the mouse, the edit insertion line falls exactly on the click or near to it rather than at the start of playback.
Splitting FX
Always create a Production FX Track from the dialogue. The reason is that sometimes these will be used for the MnE or it will be easier to sync foley to match to this if needed.
Lock the Sync
It is possible in Pro Tools to Time Lock a clip. This means that the clips can be edited, cut, split, copied etc but the clip cannot be shifted from its timecode location. You can move the clip to another track, yet the sync if locked will remain the same. To do this, select the clips once you have checked all sync, and go to Clip -> TimeLock/Unlock. (Control+Opt+L). These clips can only be moved vertically not horizontally.
Sync Points
Use Sync Points on dialogues (Using Command+,) to put a sync mark. If you take out tab to transients, yo can then tab to these sync points. if there is a place where this clip has to spot with the sync point, use Ctrl+Shift and Click on the clip to spot it to the selection start or cursor. This helps by not having to cur the head of the clip to spot etc.
Using Elastic Audio to Sync
You can use elastic audio to sync up dialogues and takes to Production track. It is far more accurate than just nudge. I make a blank track and select monophonic in the track. This is kept towards the reference dialogue. When any ADR needs to be matched finely, I just drag and drop the clip onto this track, use the warp markers to line up the dialogues and then drag and drop the clip back to its respective track. This processes the clip to the needed sync.
FM

With Izotope RX 6 Ambience Match it´s now super easy to get a room tone out of your dialogue. Your tip is still pretty useful & a good method.
Yeah. You are right! This was written in 2013! And maybe in my mind much before too! Thanks for reading!