
1 Why We Need Reverb
Understanding a reverb was very challenging to me. I could figure out the musical ones and the long tailed ones for effects and other things. But I could not understand how to modify this for dialogues, Foley, effects and so on. As with everything else, this frustrated me and I wanted to know how it worked. That was when I decided to go and learn the fundamentals. These are from my notes and things I learnt.
When sound leaves a source in a real space, it travels outward in all directions at once. The direct path reaches your ears first. Then come the reflections. And these can be off the nearest wall, the ceiling, the floor, with each one arriving a few milliseconds later and a little quieter, because every surface absorbs some of what it reflects. Now, those early reflections bounce again off other surfaces, and those bounces bounce again, and within a fraction of a second you have hundreds of distinct copies of the original sound arriving from every direction simultaneously. The room is full of the sound even after the source has stopped making it. This is Reverberation. The size of the space determines how long those reflections take to arrive. The material of the surfaces determines how quickly they die away. That means stone and concrete reflect longer than wood, wood longer than fabric. The shape of the room determines how reflections cluster and how evenly they spread over time. All of this happens automatically, in every space you have ever stood in. Our ears learned what it sounds like so early in your life that we stopped hearing it consciously. What Schroeder set out to do in 1962 was understand this well enough to build it from mathematics.
1.1 What Schroeder Figured Out
Manfred Schroeder was not trying to build a product. He was solving a mathematical problem. His 1962 paper in the Journal of the Audio Engineering Society, Natural Sounding Artificial Reverberation, laid out the challenge with extraordinary clarity. A convincing reverb needs high echo density. This means it is more than a thousand separate echoes per second. Fewer than that and you hear individual repeats, which sounds like an echo unit rather than a room. In addition, the frequency response also needs to be flat, meaning the reverb should not make some frequencies louder than others. This was a problem he called coloration. Along with this, the decay should be smooth and exponential, the way real rooms decay.
The simplest way to build artificial reverb is a feedback system. You take a delay line, feed some of the output back to the input through a gain control, and you get a series of evenly spaced echoes that fade over time. It sounds a bit like two parallel walls bouncing sound between them. The problem is the frequency response is terrible. Comb filters create strong peaks and dips across the spectrum, and the result sounds metallic and ringy. Chain several of them together trying to get higher density, and the coloration becomes completely unacceptable.
Schroeder’s breakthrough was the allpass filter. He worked out that if you construct a delay line with a very specific combination of feedforward and feedback that were chosen in such a way that the two signals balance each other precisely he could get a perfectly flat frequency response. It adds phase shift, but no coloration. It can create a dense stream of echoes without making anything louder or quieter. He called it colorless artificial reverberation.
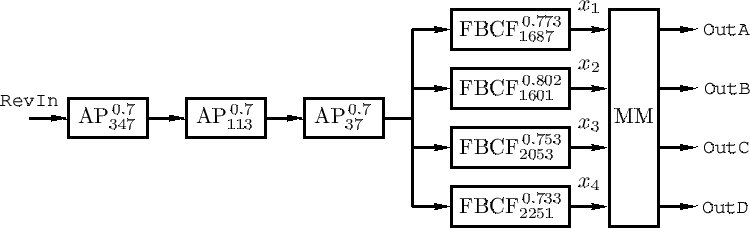
Now, what Schroeder built was a bank of comb filters running in parallel. Each one had a different delay time, and those delay times were chosen to be prime numbers relative to each other. You see, if the delays share common factors, their resonances line up and you get these metallic peaks in the sound. When we separate them by prime relationships, we keep the resonances spread apart. After those comb filters, he ran the signal through a chain of allpass filters in series. The comb filters that were there, handled the overall decay time, giving you that sense of how big the space is. The allpass filters take those echoes and diffuse them into something that actually sounds like a room.
What makes Schroeder’s thinking hold up even today is that he separated two problems that people were treating as one. Decay is one thing. Diffusion is another. That means you can tune them independently. Lexicon eventually gave the allpass control a name. They called it Diffusion, and it became one of the most important parameters in reverb design. Every serious reverb plugin has some version of it today, sixty years after Schroeder’s paper.
But there was one thing his architecture could not do well. You see, the echo density in his design stayed constant throughout the decay. Real rooms do not behave like that. In a real room, the density of reflections keeps increasing with time. The initial bounces are relatively sparse, and they multiply into a dense cloud as they keep hitting surfaces. Schroeder’s parallel combs produce the same density from the first millisecond to the last. That was the next problem someone had to solve.
1.2 Gerzon and the FDN
In December 1971, Michael Gerzon published a paper called Synthetic Stereo Reverberation, Part 1, in Studio Sound magazine. Studio Sound was a UK trade publication with very limited circulation in the United States. So most American researchers and engineers simply never saw it. That matters, and I will come back to it.
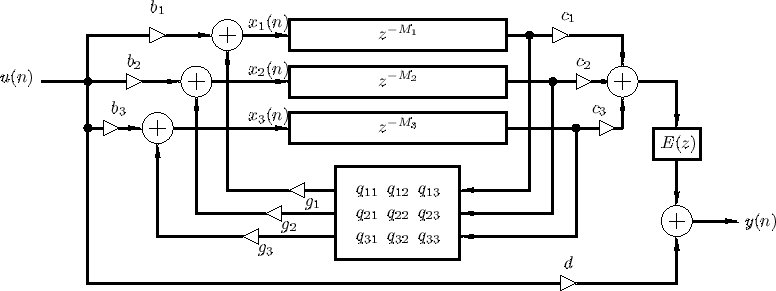
What Gerzon established in that paper was the feedback delay network or FDN. It was made of several parallel delay lines, combined through what he called an orthogonal matrix, with the outputs of that matrix fed back as inputs to the delays. Gerzon had noticed that individual feedback comb filters sounded poor. But several of them cross-coupled through the right matrix sounded significantly better. He was also specifically thinking about stereo spreading of the reverberation. At that time, most artificial reverberators were only trying to decorrelate the two output channels. Gerzon wanted spatial image.
Now, the cross-coupling is what solves the density problem. You see, because every delay line feeds into every other delay line on each pass through the matrix, the number of distinct echoes keeps multiplying. After one pass you have a few echoes. After several passes you have a dense cloud. The density (number of reflections) builds with time, exactly the way a real room behaves. That is what Schroeder’s design could not do.
Part 2 of this came in January 1972. That paper extended the FDN concept in several important directions. Gerzon showed how to create allpass feedback delay networks, where the feedback structure itself has allpass properties. He also showed how to add filters inside the feedback paths to get frequency-dependent decay time, so higher frequencies decay faster than lower frequencies, the way they do in a real room. And he made an important statement that reverb designers have been working with ever since. He said that by repeated applications of feedback networks and of cascading, a wide variety of unitary networks can be created out of just a few basic unitary circuits. Bill Gardner at MIT, who later developed the allpass loop reverb architecture that Lexicon’s algorithms are built around, has said he first learned many of these ideas not from Gerzon’s papers but from working in the electronic musical instrument industry. The ideas were circulating privately long before they appeared in published literature.
So this matrix was exactly the missing piece from Schroeder’s design. The FDN solved the density problem, and it solved it mathematically. Because every delay line feeds into every other delay line through the matrix, the number of echoes keeps multiplying on each pass. The density builds with time, exactly the way a real room behaves.
1.3 James Moorer and Three Changes
James Moorer published an article called About This Reverberation Business in the Computer Music Journal in June 1979. Moorer was working from Schroeder’s architecture, and he addressed three separate problems in the same paper.
If we think about it, Schroeder’s comb filters used a plain gain coefficient in the loop, the same value at all frequencies. That meant every frequency decayed at the same rate. Now, air absorbs high frequencies more than low frequencies. Hard surfaces hold on to low end longer. In a real room, the tail gets progressively darker as it decays. Moorer replaced that plain gain coefficient with a one-pole lowpass filter. Every time the signal goes around the loop it loses a little high frequency energy. The more passes, the darker the tail gets. That change made the comb filter architecture sound significantly more natural. It is also the reason the words damping and HF decay appear on almost every reverb unit made since.
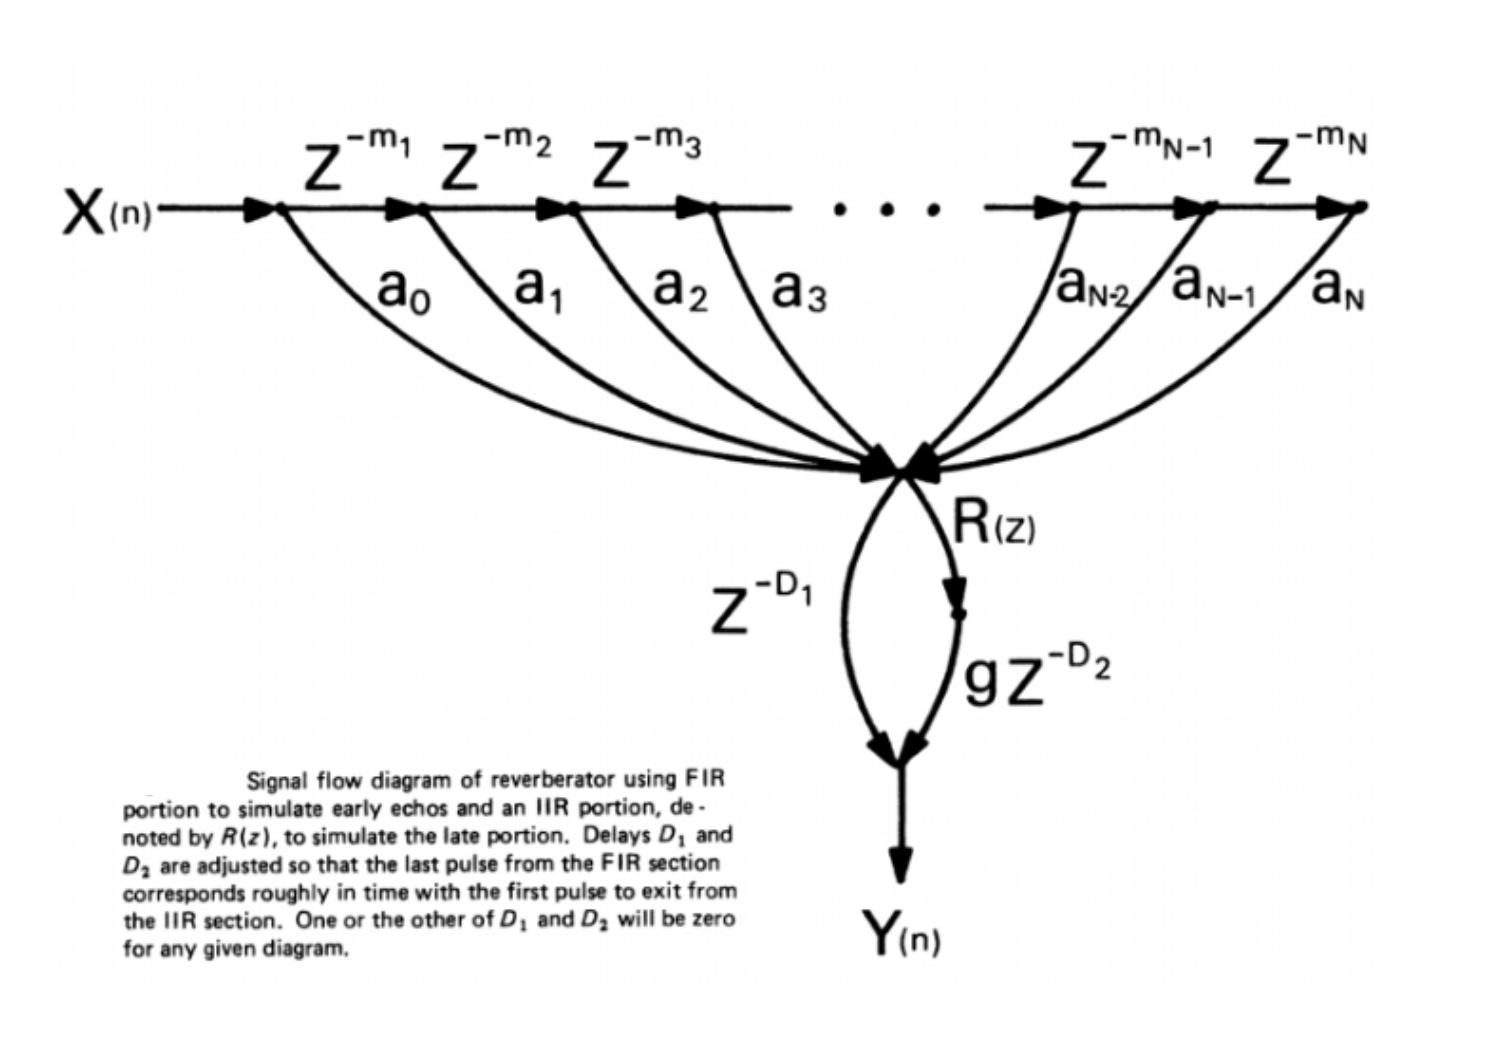
The second thing Moorer did was separate the early reflections from the late reverb tail and handle them with different tools. He used a tapped delay line, which is a sparse FIR filter, to simulate the early reflections. Those are the first discrete bounces you hear in the first hundred milliseconds or so of a real room. Schroeder’s design had not addressed early reflections separately at all. Moorer modelled them directly using delay taps whose positions and gains he worked out carefully. The paper actually includes specific tap time values he found by ear. He notes that simply choosing prime number positions does not automatically sound good. The early reflection response then feeds into the comb and allpass network for the late diffuse tail. That two-stage approach, early reflections handled separately from the dense tail, became a standard way of thinking about reverb design from that point on.
The third thing was that Moorer worked out a more efficient version of the allpass filter requiring only two multiplications per sample. Schroeder’s original allpass required three. For the digital hardware of 1979, where every arithmetic operation cost silicon and processing time, that was a meaningful saving. Moorer’s two-multiply allpass became the standard building block of algorithmic reverb. You will find it at the centre of most serious reverb algorithms even today.
2 The Hardware
2.1 Barry Blesser and the EMT 250
In 1974, Barry Blesser was teaching at MIT and also working as a consultant to audio companies. He had helped launch Lexicon a few years earlier. That whole thing started with a chance encounter with Francis Lee at 3am in the MIT computer lab. Blesser understood better than almost anyone the gap between what Schroeder had theorised in 1962 and what could actually be built in silicon. So when EMT, the German company whose plate reverbs were hanging in every serious studio in the world, decided they wanted to build a digital reverb, they came to Blesser. What followed was two years of work between Blesser, EMT’s Karl-Otto Bader, and a Massachusetts engineering firm called Dynatron. The result was the EMT 250, which launched in 1976 at a price of $20,000. Only 250 units were ever made.
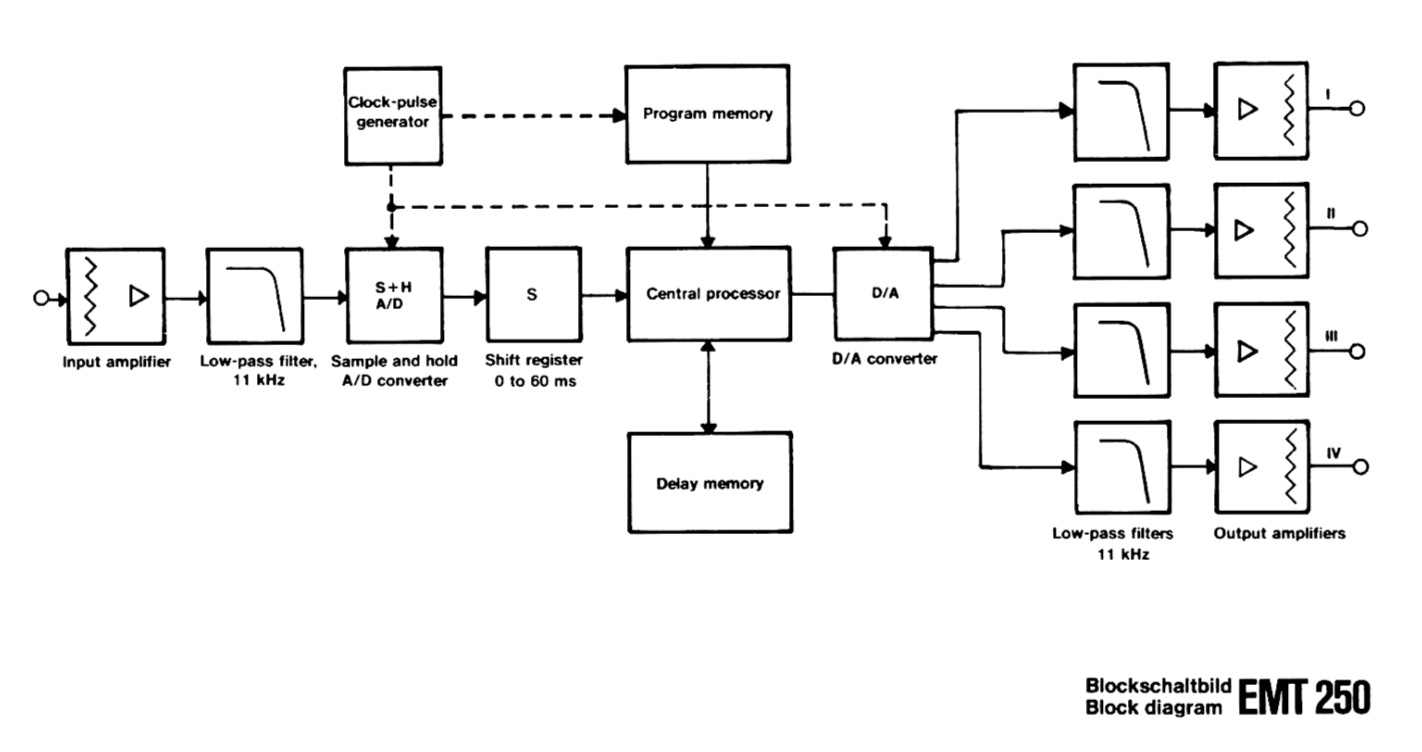
The hardware was extraordinary for its time. Approximately 500 integrated circuits. 16 kilobytes of memory. Three cooling fans. Heat sinks covering the entire exterior of the cabinet. The power supply was mounted separately and painted red. In fact, Blesser later said they had taken all the hardware limitations and turned them into signature design features.
The EMT 250 used a 12-bit converter running at 24 kHz. The reverb program memory was a circuit comprising 19 different delay elements, each with a different delay time, some connected with feedback, the feedback factors dependent on the control panel settings. The unit ran at 50 nanoseconds per instruction, which was fast for 1976. The lever controls on the top panel were designed to look like aircraft throttle controls by industrial designer Peter Bermes. They adjusted decay time and the balance between high and low frequency decay. You pushed the levers and it changed. It became one of the most beloved user interfaces in the history of studio equipment.
The sound of the 250 was unlike anything that had existed before. Clearer than plates, more open than chambers, with a specific shimmer in the high frequencies that engineers immediately recognised as something new. It appeared on Michael Jackson’s Thriller, Prince’s Purple Rain, Elvis Costello’s Spike, and thousands of other records. Studios that could afford one never got rid of it.
The UAD emulation of the EMT 250 was made with Blesser’s direct involvement, modelled on Allen Sides’ original unit. Universal Audio had Blesser reverse-engineer his own algorithm to make it. It remains one of the most convincing hardware emulations ever made. If you have not spent serious time with the 250 sound, that is a good place to start.
2.2 Christopher Moore and the Space Station
In the spring of 1977, Christopher Moore resigned from his job as Project Engineer at Lexicon, walked down into his cellar, and started building a reverb from scratch. His goal was to build a great-sounding digital reverb that a working studio could buy for $2,000, at a time when the EMT 250 cost $20,000 and almost nothing else existed. He had no DSP chips, well because those had not been invented yet. His digital hardware experience was limited. He read a book on digital design, set up a workbench, and got started. The result was the SST-282 Space Station launched at the 1978 AES Convention in Los Angeles. Just under 2,000 units were ever sold. Today, a working one costs more than the original EMT 250.
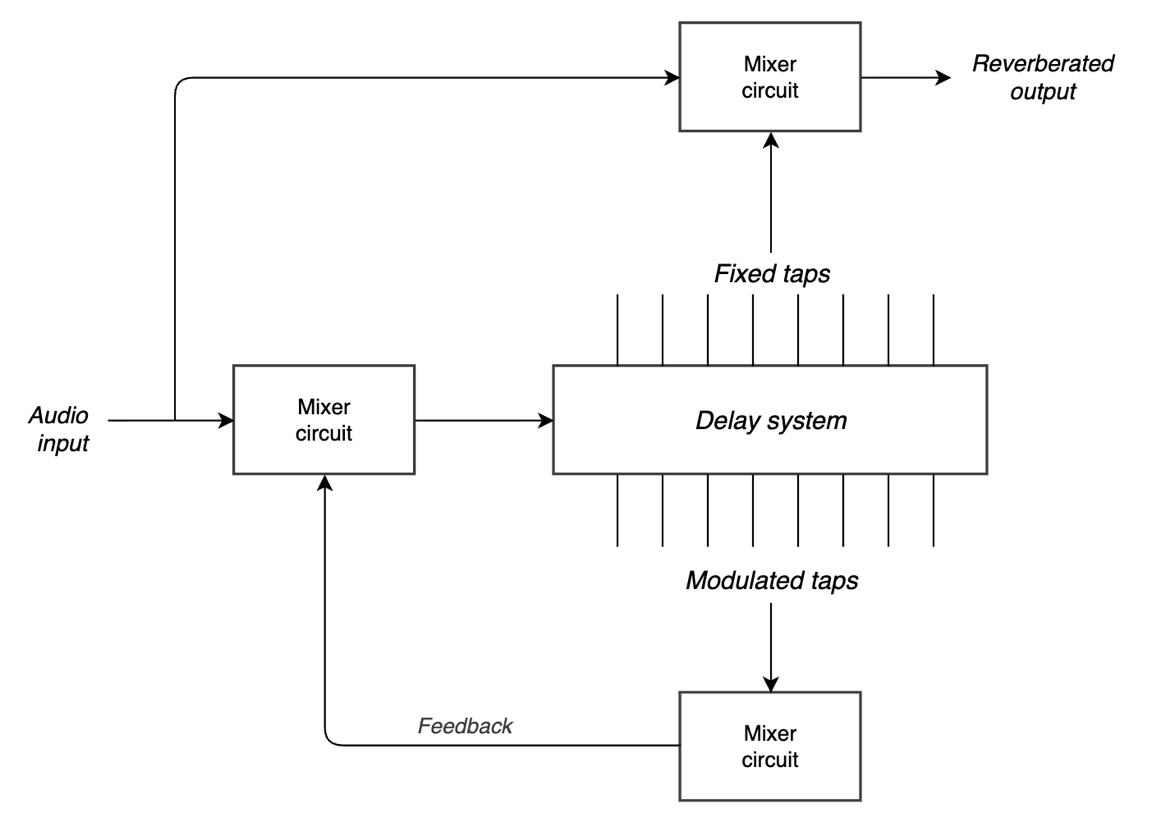
The architecture Moore used was unlike anything else at the time. He built it around a single delay line of 255 milliseconds of digital memory, with 15 taps wired back to the input as feedback and 8 additional taps feeding the stereo output. Now, a multi-tap delay line with feedback is straightforward in principle. The problem is stability. A network with 15 feedback taps has a maximum stable feedback gain equal to one divided by the number of taps under normal circumstances. Push beyond that and it oscillates. Moore needed much higher feedback gain to get reverb times of 3.5 seconds, and he could not get there without the system going unstable.
His solution was to slowly and randomly modulate the delay positions of the feedback taps over time. If the taps are constantly moving, the resonant frequencies of the network are constantly changing too, and they never have time to build up into oscillation. Moore patented this approach. The block diagram is actually printed right on the front panel of the hardware, which tells you something about how openly Moore documented his own work.
Now, Moore was also honest about the flaws in his own design. The modulation caused spectral smearing in the output. The delay taps had no interpolation. They were simply picked up and moved 62 microseconds at a time with no smoothing at sample boundaries, which generated modulation noise. And the audition taps that fed the stereo output also picked up the dry source as early reflections, which made it difficult to get a truly distant reverb sound. So he separated the taps into two groups. Fifteen modulated taps for feedback only, to maintain stability. Eight unmodulated taps for the stereo output that you actually hear. The feedback taps roam around constantly. The output taps stay still. That separation is what made the sound usable because the instability is managed in the feedback path where you do not hear it directly.
The Space Station does not sound like a room. It sounds quite unique. Rich, animated, with a specific warmth in the mids and a shimmer that sits somewhere between reverb and chorus. You see, Moore was not trying to simulate reality. He was building a musical tool, and he succeeded in a way that nobody had anticipated. Later designs from Moore, the StarGate, the AKG ADR-68K, algorithms for Kurzweil, moved toward more conventional stable architectures. But the Space Station remained the one that sound designers kept reaching for.
2.3 David Griesinger and Lexicon
David Griesinger is a Harvard physicist who has spent much of his professional life thinking about how humans perceive acoustic space. He records classical music seriously as a hobby, often using a recorder as his test instrument when he runs his own listening experiments. When he joined Lexicon and developed his ideas about digital reverberation in the late 1970s, the result became the Lexicon 224. It launched in 1978, and many engineers still consider it the most influential reverb unit ever made.
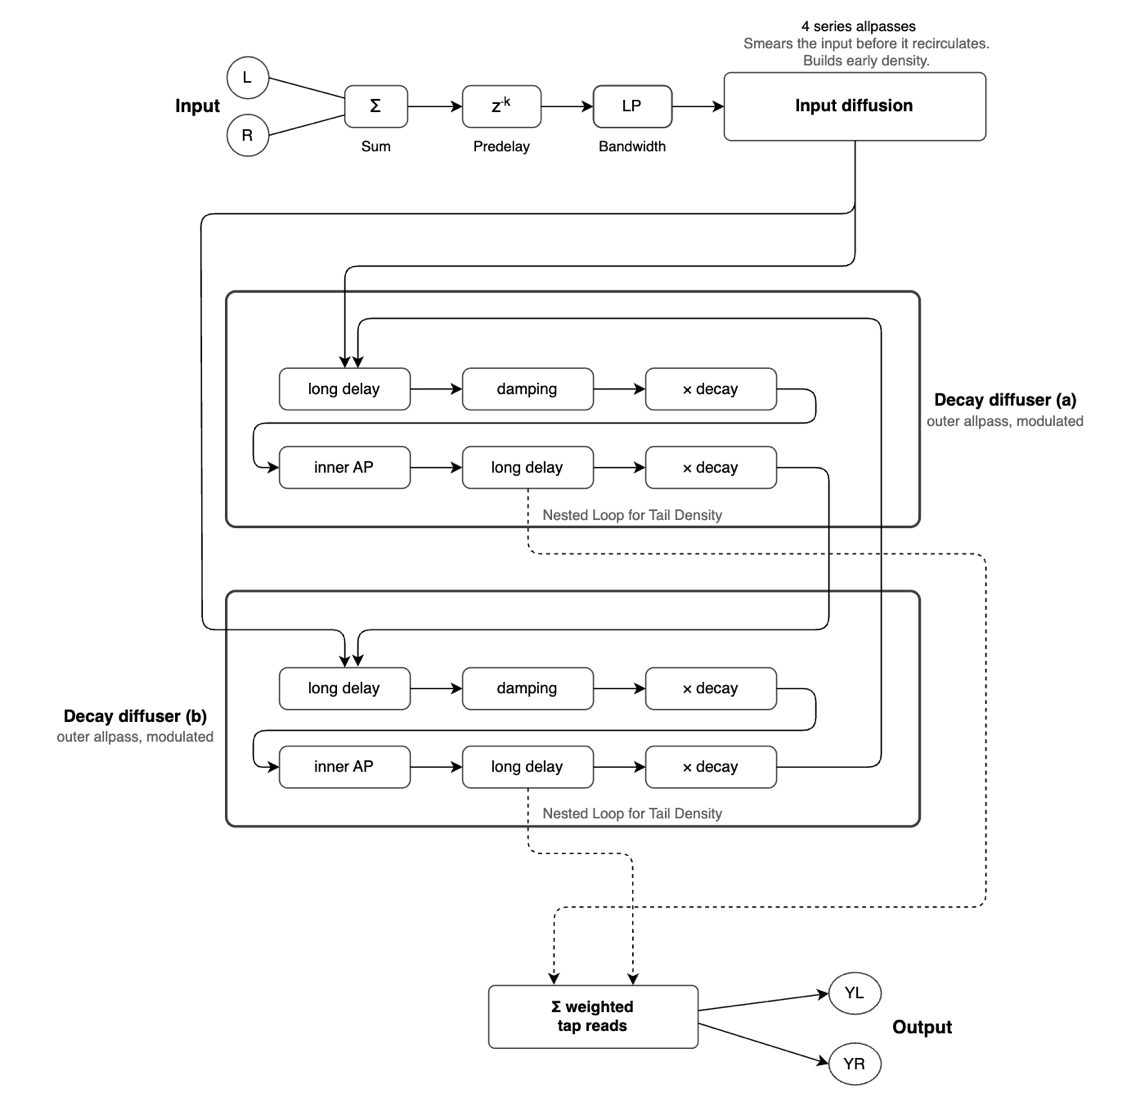
The 224 used an architecture that combined nested allpass loops with Griesinger’s understanding of what the psychoacoustics research was saying about how we perceive reverberant space. Nested allpass loops means allpass filters embedded inside each other’s feedback paths, which creates high echo density from a small number of delay elements. The result was a reverb with a cinematic, expansive quality and exceptionally long decay times that no earlier unit had quite managed.
The 224 ran at a sample rate of 20 kHz. The actual usable audio bandwidth came in at around 8 kHz once you account for the anti-aliasing and reconstruction filters, which need some headroom to do their job properly. The converters themselves were 12-bit, but Lexicon implemented a clever input gain-shifting circuit that gave an additional 24 dB of headroom, bringing the effective dynamic range up to roughly 16 bits. Internally, the processor used a 16-bit word size with a 20-bit saturating accumulator, which gave the unit about 24 dB of internal headroom before things began to clip hard. These were the hardware limitations of what was possible in 1978, but they gave the 224 a specific character. The high-frequency rolloff at long decay times came from a different source. The 224 used linear interpolation in its delay line modulation, and linear interpolation acts as a FIR lowpass filter. It progressively attenuates frequencies as they approach Nyquist, with the amount of attenuation depending on where you are between two samples. Each pass through the allpass network compounds this rolloff. At a 70-second decay time, the signal is going around those allpass loops a few hundred times, so what starts as a small loss in the high end at one pass becomes a substantial loss by the time the tail has fully decayed. The result is that warm, slightly grainy quality on long decays. Those long decays, grainy and beautiful, are the sound of the 224 pushing against the limits of its converters and its modulation interpolation. In another context that would be a flaw.
The 224’s LARC remote controller eventually offered direct control over the allpass diffusion coefficient. Lexicon called it simply Diffusion. But this was not available at launch on the original 224. It was introduced on the 224XL alongside the LARC controller, in the version 4.0 software update. Lexicon was nonetheless the first company to offer diffusion as a user-accessible parameter, and it became one of the most important controls in reverb design.
The Lexicon 480L arrived in 1986. By that point Griesinger had made a fundamental shift in how he thought about reverb design. He had moved from a room-based model to a perception-based model. You see, the earlier reverbs were all asking the same question. What happens in a real room? Griesinger was asking something different. How do we perceive a real room? And those questions have different answers.
He divided the perception of reverberant space into three separate qualities. Intelligibility, distance, and envelopment. Now, each of these is shaped by a different time range of reflected energy, and that distinction is what drove the entire design of the 480L.
The key boundary is 50 milliseconds. Reflections arriving within the first 50 ms after a direct sound do not register as separate events for the ear. They fuse with the direct sound. They do not damage intelligibility. Instead, they are giving you the sense that you are at some distance from the source, and that you are inside an acoustic space. Reflections arriving after 50 ms behave differently. They can be perceived as discrete events, they can be localised, and too much energy in the 50 to 150 ms range is exactly where intelligibility problems start.
Now, envelopment is a separate perceptual quality from distance. You can hear the reverb clearly, you can feel distant from the source, and still not feel enveloped by the space. For envelopment to happen, reverberant energy has to arrive from multiple directions at once, in a way the ear cannot quite localise, wrapping around you.
And this is where the 480L’s Random Hall algorithm comes in. Still probably the most requested reverb program in professional film and music production. The whole thing is built around this thinking. The early reflection pattern is different on every output channel, and it is constantly changing, with random delay elements that prevent the ringing you would otherwise get from a static network. Now, because these reflections are arriving within the first 50 ms, the ear cannot localise where they are coming from. All it knows is that you are no longer close-miked. The instruments move out of the speakers. The space appears around them. Then the late reverb arrives highly uncorrelated between channels, and that is what gives you the sensation of being inside the space rather than listening to it from outside.
The Shape and Spread parameters on the 480L work together to sculpt how the reverb energy builds after the onset of a sound. Shape determines the envelope of the reverberation. Spread controls the duration of that initial contour. Low Spread settings give you a rapid onset with very little sustain. Higher settings spread the buildup and the sustain out across more time. The 480L also refined the split-decay approach Lexicon had been using since the 224, giving you independent control of high and low frequency decay times around an adjustable crossover.
2.4 AMS, Eventide, and the Rest of the First Generation
The AMS RMX16 arrived in 1981 and became the other reverb from that era that engineers still actively seek out. Where the Lexicon had warmth and lushness, the RMX16 had a harder, more defined character. Its Non-Linear preset, a reverb that builds to full density and then cuts off instantly at a user-set decay time rather than fading naturally, became the signature sound of 1980s pop and rock production. The gated snare drum sound that defines that decade runs through the Non-Linear program on an AMS RMX16.
The Ambience program is what matters most to us in film post. The way AMS describes it in the manual is “somewhere between a hall and a plate,” but with the dimensional cues of a hall deliberately minimised and the colouration of a plate kept low. What you get is a very neutral reverberant character. You can run it short for tight rooms or long for bigger spaces, but the key thing is it blends. It does not impose a hall identity on the scene, it does not give you that obvious plate brightness. It just adds a sense of acoustic space. And for someone working on ADR, that is exactly what you need. You are trying to make a clean voice match the production sound that was recorded on location, with all its imperfect room reflections and its uncontrolled space. You want to add the absence of dryness, if that makes sense. The Ambience program does that better than almost any other tool in the rack.
Eventide’s SP2016 came around the same time. The architecture Eventide used for the SP2016 has been studied carefully. Whether the SP2016 itself contains FDN reverbs is not confirmed in the published literature, but the sonic character points in that direction. What is clear is that it sounds denser and more physically convincing than the Lexicons. Less lush, more like a real space. That combination makes the SP2016 programs particularly useful for dialogue work where you want the acoustic environment to feel real.
The TC Electronic M5000 and its successors introduced downloadable algorithm cards, so you could add new reverb programs to the hardware separately. That modular approach influenced software reverb design enormously. TC’s transparency and clarity gave engineers a third distinct voice alongside the Lexicon warmth and the AMS edge.
3 How Reverb Actually Works
3.1 The Four Building Blocks
If you strip away every brand name and every decade of development, you’ll see that every reverb ever built is made from the same four components. Understanding what each one does makes the differences between reverb types much easier to understand.
The Delay Line. A delay line is a buffer that holds audio samples and releases them a fixed number of samples later. At 48 kHz, 4,800 samples is 100 milliseconds. Every reverb is built from many delay lines of different lengths. The art of reverb design is largely the art of choosing those lengths and deciding how to connect them.
The Comb Filter. Take a delay line and feed some of its output back to its input. The signal circulates, getting quieter with each pass. Play a click through it and you hear a series of evenly spaced echoes that decay over time. This is a feedback comb filter. It is the simplest simulation of two parallel walls bouncing sound between them. The delay time sets how far apart the echoes are. The feedback coefficient tells us how long they take to die. The problem is the frequency response. You see, comb filters reinforce certain frequencies and cancel others, giving the reverb a metallic, ringy quality. This is the coloration part that Schroeder was trying to solve.
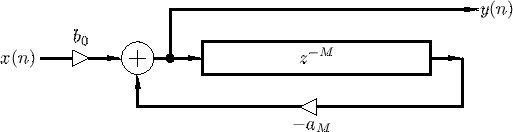
The Allpass Filter. Schroeder’s solution to the coloration problem was by wrapping a specific mix of feedforward and feedback around a delay line. The allpass filter has a perfectly flat frequency response in theory. It adds no coloration. It does add phase shift, but for the short allpass sections used at the input of reverb algorithms as diffusors, it passes all frequencies equally. This is the fundamental idea of reverb diffusion.

The Unitary Mixing Matrix. In an FDN, the outputs of all the delay lines are mixed together through a matrix, and the result is fed back as input to each delay line. For the network to be stable, the matrix has to be designed so it does not amplify energy. Gerzon showed that any orthogonal matrix – where the matrix and its own transpose multiply to give the identity matrix – guarantees this stability. The simplest one for four delay lines is the Hadamard matrix, a pattern of plus-ones and minus-ones where every output receives a mix of every input at equal weight. More complex matrices produce denser mixing and are part of how different FDN reverbs get their individual character.
3.2 The Algorithm Families
With those four building blocks, there are only a handful of fundamentally different ways to build an algorithmic reverb. Understanding the families helps you understand why different reverbs sound different, and why reaching for a particular one makes sense in a particular situation.
Schroeder / Moorer – The Original Blueprint. Parallel comb filters flowing into series allpass filters, with lowpass filters in the comb feedback loops to model high-frequency absorption. The oldest architecture and still capable of excellent results when tuned carefully. The metallic quality that plagued early implementations has been addressed in modern designs through careful choice of delay lengths, modulation, and better allpass designs. The free reverbs bundled with most DAWs are usually some version of this architecture.
FDN – The Modern Standard. Multiple delay lines mixed through a unitary matrix, with allpass diffusors at the input and lowpass filters in the feedback loops. This is the dominant architecture in professional reverbs since the early 1980s. The Lexicon 224, the 480L, the Eventide SP2016, and most high-quality modern algorithmic reverbs are FDN at their core. The number of delay lines – commonly 4, 8, or 16 – the choice of mixing matrix, and the design of the diffusors are where individual reverbs get their personality. Two reverbs can both be FDNs and sound completely different.
Allpass Loop / Ring Structure. A specific FDN variant where allpass filters are arranged in a loop – the output of the last feeds back to the first. Nested allpass loops, where one allpass filter’s delay element is replaced by another allpass filter inside it, can produce extraordinary density with relatively little computation. This is the structure underneath the characteristic Lexicon sound. Valhalla VintageVerb, FutureVerb, and most of the best modern algorithmic reverbs are built on variations of this approach. Jon Dattorro’s 1997 paper in the JAES is the closest thing to a public description of this architecture.
Multitap Delay – The Space Station Approach. A single long delay line with many output taps, some used for feedback and some for the stereo output. Stabilised through time-varying modulation of the tap positions, as Christopher Moore patented. It does not naturally produce the density of a good FDN, which is partly why the Space Station sounds the way it does. Nobody else really pursued this architecture for mainstream reverb, but it remains irreplaceable for what it does.
Physical Plate Modeling. True physical modeling of a plate reverb uses waveguide mesh networks – a two-dimensional grid of delay lines that simulate the physical behaviour of a thin steel sheet in wave propagation. This is computationally expensive. More commonly, the plate sound in plugins is achieved by tuning FDN parameters to produce plate-like behaviour rather than modeling the physics directly. The better plate plugins do both.
Physical Spring Modeling. Spring reverbs are substantially harder to model than plates because the wave propagation in a coiled spring is dispersive – different frequencies travel at different speeds – and nonlinear. Research published at the DAFx conference in 2024 showed that several neural network architectures can learn the input-output behaviour of a spring reverb with enough accuracy that listeners cannot reliably distinguish the model from the hardware. The best spring emulations in software are increasingly doing something similar under the hood.
4 Reverb Parameters
4.1 The Controls
Pre-delay. The time between the dry signal and the first reverb reflection. In a real room, this is determined by how far the nearest hard surface is from both the source and the listener. A pre-delay of 20-30 milliseconds sounds like the source is several metres from the nearest wall. Very short pre-delay – under 5 milliseconds – gives a tight, close room feel. Longer pre-delay – 50 to 100 milliseconds – creates a sense of the source being in front of a large stage.
For film dialogue, pre-delay is one of the most important settings you have. If it is too little, the reverb starts immediately after the consonants, muddying intelligibility. A pre-delay of 15 to 30 milliseconds keeps the reverb distinct from the direct signal and preserves clarity. For guns and explosions, shorter pre-delay gives the sound a physical, immediate quality. For ambience reverb sends, longer pre-delay pushes the environment further behind the dry source.
Decay / RT60. RT60 is the time for the reverb tail to decay by 60 dB from its initial level. This is also what we commonly call as decay time. In real rooms this ranges from under 0.3 seconds in a very dead recording space to 10 seconds or more in large cathedrals. For dialogue in interior scenes, 0.5 to 1.2 seconds covers most realistic environments. For exterior scenes, shorter decay times with more prominent early reflections and minimal late tail sounds more physically accurate. This is because outdoor spaces do not build up the dense late-field reverberation that enclosed rooms do. For scoring stage ambience on music stems, 2 to 4 seconds is common.
High-frequency decay time is usually shorter than low-frequency decay time in real rooms because air absorbs high frequencies more readily. Matching this in your reverb makes the tail sound more physically accurate and also keeps it from ringing unpleasantly.
Diffusion. Diffusion controls two things at once. How quickly the reverb tail reaches high echo density, and how smoothly the source blends into it. High diffusion smears the attack. This causes the source material to dissolve into the reverb tail without any distinct early reflection events. You hear the space, but you do not hear the room building around the sound. It just arrives, already enveloped. Low diffusion does the opposite. It preserves the transient character of the source and lets the early reflections speak individually before the tail builds behind them. You hear the crack, then the room.
Now, for dialogue and vocals, medium to high diffusion typically sounds more natural. You see, the ear is very familiar with the sound of a voice in a reverberant space. In a real room, the voice and the room are already blended by the time the sound reaches you. High diffusion can recreate that quality. It puts the voice inside the space rather than in front of it.
For percussion and gunshots, the calculation is different. A snare crack or a rifle shot has a transient that carries information. The sharpness of that attack is part of what makes it cut clearly through a mix. Low diffusion lets that transient arrive cleanly before the reverb tail builds behind it. The crack and the room stay as two separate events. A gunshot that blurs into its own reverb loses authority. A gunshot that snaps and then decays into the room sounds like it happened in a real space.
Early Reflections Level. This is the separate level of the first distinct bounces relative to the late reverb tail. In a real space, early reflections carry the most important information about room size and surface material. The late tail provides envelopment. Increasing the early reflection level makes the room identifiable and the source spatially located. Reducing it and relying more on the tail creates a sense of diffuse envelopment without a clear spatial frame.
5 Convolution
5.1 What is an Impulse Response
If you play an instantaneous click through a speaker in a cathedral and record what happens afterward with a microphone, what you capture is the complete acoustic fingerprint of that cathedral. This includes early reflection, late echo, the exact rate at which energy dies away at each frequency, the specific quality of that space as heard from those two exact positions. It is everything the room does, compressed into a single recording. This instantaneous click is called an impulse and what we recorded is the response to that impulse.
Convolution reverb takes that fingerprint and applies it to any audio. The mathematics, called convolution, multiplies the frequency content of your dry audio against the frequency content of the impulse response, then converts the result back to the time domain. The result sounds exactly as if your dry audio had been played in the original space, from the speaker position to the microphone position where the impulse response was captured.
In practice, capturing an impulse response with a starter pistol or a balloon was how it was done for years. The modern method is a sine sweep. This is a tone that rises slowly through the entire audible frequency range, played through a calibrated speaker and recorded with calibrated microphones. Software then mathematically deconvolves the sweep from the recording to extract the pure impulse response. This gives better signal-to-noise ratio and avoids the nonlinearities that affect pistol and balloon methods. In fact, Audio Ease have published detailed technical documentation on their IR recording methodology, which is part of why the Altiverb library sounds different from most competing collections.
5.2 Altiverb and the Library Question
Audio Ease’s Altiverb was one of the first commercial convolution reverb plugins, arriving in the early 2000s when CPUs had finally reached the point where real-time convolution was practical at professional sample rates. What separated Altiverb from competitors was not the engine – it was the library.
They actually traveled to the spaces they wanted to capture. Disney Hall in Los Angeles. The Berlin Philharmonie. The Sydney Opera House. They recorded impulse responses with DPA 4006 microphones through Genelec monitors, with consistent methodology every time. For film post-production, the library includes car interiors, aircraft cabins, various rooms, industrial spaces, bedrooms, outdoor environments, and a large collection of classic hardware reverbs captured as impulse responses – the EMT 250, the AMS RMX16, the Lexicon 480L.
Convolution has a limitation though. The impulse response is a static snapshot. Algorithmic reverbs introduce subtle time-varying modulation that keeps the tail alive and prevents a slightly glassy, frozen quality on sustained notes. Altiverb addresses this with its Brightness feature, which adds an algorithmic reverb component blended into the tail. Hybrid approaches like this – convolution for accuracy, algorithmic for movement – are now common in high-quality reverb design.
5.3 What Convolution Can’t Do
Convolution reverb is superb at exactly one thing. That is placing a sound inside a specific, precisely captured space. For dialogue matching, for adding the character of a specific plate reverb, for realistic room simulation where accuracy matters, convolution is unmatched. But it has real limitations in a mixing environment.
You see, you cannot significantly change the character of a convolution reverb without changing the impulse response. An algorithmic reverb can move from a small room to a concert hall as you turn a knob. A convolution reverb requires loading a different IR.
Convolution reverbs also cannot be meaningfully modulated in real-time. The subtle pitch variation that keeps an algorithmic reverb tail alive would require changing the impulse response on a sample-by-sample basis. This is why a long sustained note through a convolution reverb can have a slightly crystallised, static quality.
For multichannel work, a convolution reverb for more than two channels requires a true multichannel impulse response. This would have to be captured with multiple microphones in the correct configuration. The library of multichannel IRs is much smaller than stereo, and processing many channels of convolution simultaneously is expensive on CPU. The method generally adopted in film mixing is to use both. Convolution for sounds where physical accuracy matters. Algorithmic for everything else, particularly where you need real-time control and the ability to make adjustments during a mix.
6 Plugin Legends
6.1 Michael Carnes and Exponential Audio
Michael Carnes spent more than 25 years at Lexicon. He was the developer behind the PCM80, the PCM96, the 960L, and the entire Lexicon native plugin suite. He considered himself second generation in reverb development, with Barry Blesser and David Griesinger as the generation before him. Both of them were friends and mentors, and he has been explicit about how much he owes to their generosity with ideas and criticism. This is from his own interview with MusicTech magazine in 2019, where he specifically said he wants to give them credit and has no desire to supersede their contributions.
When he left Lexicon in 2013 and started Exponential Audio, he launched with two plugins built on fundamentally different architectures, each designed for a different purpose.
PhoenixVerb and R2. PhoenixVerb was built around the idea that the best reverb is the one you stop noticing. Carnes wanted an algorithm that could be set high enough to fill a space and still not create artifacts, modulation noise, or metallic coloring. His background in classical composition and years of sitting in concert halls gave him a precise internal reference for what natural reverberation sounds like. PhoenixVerb was his attempt to reach that target algorithmically.
The key innovation was how he handled early reflections. At the density he was working at, which was dozens to hundreds of distinct reflections, managing each one individually was impractical. Instead, he created what he called early reflection patterns. These are sets of reflections with a specific character that could be stretched or compressed in time with a single dial, while maintaining their relative relationships. If we scale the pattern up, the room gets bigger. Scale it down and it gets smaller. Overall level stays consistent.
R2 was built on a different philosophy. Where PhoenixVerb is designed to disappear into a mix, R2 is designed for situations where you want the reverb to be part of the sound. The modulation is tuned to be audible and musical. This is like the pitch movement and swirling that engineers associate with classic Lexicon hardware. R2 also has a gate function and chorus parameters, making it the more characterful of the two.
Second Generation Plugins. The second-generation plugins, namely the Nimbus, R4, Stratus 3D and Symphony 3D, added features that reflected how Carnes understood reverbs actually get used in professional mixing. Two of those features are particularly useful for film post.
The Warp page introduced compression, expansion and saturation inside the reverb signal path itself. It sits on the wet reverb output, before the signal goes back to the mix bus. So when you compress, you are compressing the wet reverberant signal, not the dry source. This gives us a way to flatten the dynamic envelope of the tail, to round off the transients that the early reflections produce, and to add saturation or bit-reduction colouration directly to the reverb. For a film mixer, this is useful when you want a vintage digital character on the reverb without inserting a separate plugin in the return chain. You get a kind of warm, slightly compressed reverb that sits more comfortably in a busy mix.
But the feature that really matters for ADR work is on a different page. It is called Tail Suppression. This is a ducking-style dynamic process that listens to the input, the output, or both, and ducks the reverb tail in proportion. So when your actor is delivering a loud, energetic line, the tail gets pushed down out of the way. When the actor drops to a whisper, the tail is allowed to bloom up to its full level. The reverb tracks the dynamic behaviour of the dialogue automatically. For ADR sessions where input levels can vary 30 dB or more between a whispered line and a shout, this is the kind of thing you used to have to do with a manual sidechain ducker on the reverb return. Tail Suppression builds it into the plugin and tunes it specifically for the way reverbs actually behave on a vocal source.
iZotope acquired Exponential Audio in 2019. Carnes has since retired. The Stratus 3D and Symphony 3D continue in the iZotope ecosystem. The underlying DSP is the same.
6.2 Sean Costello and Valhalla
Sean Costello started designing reverb algorithms in 1998 as an academic project. By the time he founded Valhalla DSP in 2009, he had spent a decade reading every paper he could find on reverb design and building algorithms in his spare time. The Valhalla plugins are not hardware emulations. They are original algorithmic designs built on deep understanding of the FDN literature, tuned entirely by ear, and sold at $50 each.
VintageVerb, Supermassive and Futureverb. Valhalla VintageVerb launched in 2012 with eight algorithms and has grown to twenty distinct modes. Each of the 20 modes is a genuinely different algorithm. They have different matrix configurations, different allpass arrangements, different modulation schemes. Dirty Hall and Dirty Plate simulate the fixed-point arithmetic artifacts and converter saturation of early hardware, reproducing the specific warmth that came from the limitations of those machines. Costello has written extensively about the design of each algorithm on the Valhalla DSP blog, which is one of the best public resources on reverb algorithm design available.
ValhallaSupermassive launched in 2020 as a free plugin and has become one of the most widely used reverb tools. The algorithms are what Costello himself describes as unrepentantly digital and unrepentantly un-natural. Supermassive has become standard for creating the enormous, spaceless environments that science fiction and fantasy demand.
ValhallaFutureVerb arrived in late 2025, the result of eight years of research focused specifically on eliminating the metallic artifacts that are the defining limitation of FDN-based algorithmic reverbs. The metallic quality comes from the fact that even carefully chosen delay lengths create frequency-domain periodicities that the ear eventually hears as tonal coloration in the tail. FutureVerb attacks this through new matrix designs and modulation approaches. It also introduces a dual-engine architecture that lets you chain the reverb and delay sections in either order.
7 Modern Technology
7.1 Cinematic Rooms
LiquidSonics’ Cinematic Rooms is what most film mixers are using right now. The terms around it like spectral achromaticity, constant density algorithm, decorrelation coding, is precise but not immediately understandable. This is my understanding of what each of these mean.
Achromaticity. Achromaticity is the term Liquidsonics uses for a specific property of their early-reflection engine. The word literally means without colour, and in acoustic terms it means the reflections do not impose any spectral colouration on the source. I think this idea did not originate with Liquidsonics. As we saw earlier, Schroeder named it first, in 1961, in a paper he co-wrote with B. F. Logan called “Colorless Artificial Reverberation.” That paper introduced the allpass filter into reverb design. An allpass filter has a flat magnitude response across all frequencies. It passes all frequencies at equal gain. It changes the time relationships between frequencies without changing the spectrum. That is colorless reverberation, in Schroeder’s own words.
But Schroeder’s colorless allpass diffusion was used for the late tail, not the early reflections. In the classic Schroeder architecture, and in every algorithmic reverb that followed it, the early reflections are still generated by discrete delay taps. Each tap produces one reflection at a specific time. The allpass network only kicks in to build echo density in the tail. So even the tail diffusion was never perfectly colorless in practice.
This is why small spaces have always been hard. When you try to simulate a small room, the early reflections arrive very quickly, which means those delay taps end up very close together in time. Close-spaced taps interfere with each other and with the direct signal. You get comb filtering. That is the hollow, metallic, boxy quality you hear when a conventional reverb tries to do a bathroom. That is Schroeder’s original problem which was never fully solved in the early reflection stage but turning up sixty years later!
What Liquidsonics did with Cinematic Rooms is bring the colorless property forward into the early reflection stage. Instead of discrete delay taps, they use a diffusion-based generator that produces spread, diffuse reflections which can be placed very close together in time without creating comb filtering. The reflections add a sense of space without colouring the source. Schroeder called it colorless. Liquidsonics call it achromatic. The word is different. The concept is the same. What is new is where in the signal path it lives, and how well the implementation holds up at very short reflection times. That is what makes Cinematic Rooms convincing on a bathroom, a car interior, a small concrete room. Spaces that other algorithmic reverbs sometimes struggle with, because they are still using an early reflection architecture that Schroeder himself did not attempt to make colorless.
Constant Density and Decorrelation. Most surround reverbs are stereo reverbs extended to handle multiple channels. The reverb engine runs at a fixed complexity, and when you activate more output channels, the same computational resources are spread more thinly. The tail density decreases as you add channels. By the time you are running a full 9.1.6 Atmos configuration, the reverb tail in each channel can be noticeably thinner than what you would hear in stereo. Cinematic Rooms uses a constant density algorithm – the reverb engine maintains the same tail density regardless of how many output channels are active.
Decorrelation coding addresses an interesting problem. What happens when you apply the same reverb to two correlated sources – say a spot microphone and an overhead microphone both picking up the same instrument, with a short delay between them? If you feed both through the same reverb instance, the correlated content in those sources travels through the same reflection network and arrives at your mix bus as two closely-timed, correlated reverb signals. They interfere. You get comb filtering.
Now, no reverb can eliminate the correlation that already exists in the source signals. But Cinematic Rooms Professional works around it by letting different instances of the plugin use different decorrelation coding patterns. Apply the same hall preset to both microphones, select different decorrelation codes, and the reflection networks inside each instance are structured differently enough that the reverb outputs are fully decorrelated even though the sources feeding them were correlated. The comb filtering disappears.
You see, the same principle applies in surround work, which is where Liquidsonics originally designed this feature. When you are running multiple instances of the plugin across a surround stem and folding down to stereo, correlated reverb outputs between channels is one of the things that makes surround reverbs fall apart in fold-down. Decorrelation coding solves both problems with the same mechanism.
7.2 Neural Networks
Plate reverbs and spring reverbs are electromechanical systems. A plate reverb is a thin steel sheet under tension, driven by a transducer and picked up by contact microphones. A spring reverb is a helical spring doing the same job. In both cases, the physics of wave propagation through the physical medium involves nonlinearities that are genuinely hard to capture with conventional modeling approaches. You can write equations that describe how waves travel through steel. But the behaviour of the real system under varying input levels, the way it saturates gently at high amplitudes, the way it responds differently to transients than to sustained tones, that is where the equations start to struggle.
Research presented at the DAFx conference in 2024 showed that several neural network architectures can learn the input-output behaviour of a spring reverb with enough accuracy that trained listeners could not reliably distinguish the model from the hardware. The key was training on signals at multiple levels, so the network could observe and learn the nonlinear response rather than being given a fixed mathematical description of it. The network does not know what a spring is. It just knows what the hardware does to every kind of signal you feed it, and it learns to do the same thing.
7.3 FabFilter Pro-R 2
FabFilter’s Pro-R 2 does something no other reverb plugin does. You can import an impulse response and the plugin will analyse it – extract the decay time, the early reflection pattern, the frequency-dependent absorption – and then configure its own algorithmic engine to produce reverb with those characteristics. It is not convolution. It is essentially an algorithmic reverb that has learned the shape of a real space.
The advantage we have here is control. Once Pro-R 2 has analysed an IR, all its parameters remain fully adjustable. You can lengthen the decay, change the frequency-dependent decay independently, adjust the early reflection level. For film work, the ability to load an IR of a set location and then modify it to match editorial requirements is practically valuable.
7.4 Bricasti M7
The Bricasti M7 arrived in 2007, designed by former Lexicon employees Brian Zolner and Casey Dowdell, and rapidly became the reference by which studio-quality stereo algorithmic reverbs are judged. It runs 24-bit, 192 kHz algorithms on Analog Devices DSP processor. The Room programs produce early reflection patterns of extraordinary realism. The Hall algorithms create a sense of envelopment that engineers consistently describe as uniquely convincing.
For film post, the M7 is primarily useful for music stems and for dialogue that needs to sit in a large, clearly defined acoustic space. It is less suited for tight room simulations. That is not what it was designed for.
7.5 The Outliers
Not every reverb in this category is trying to simulate a space, impossible or otherwise. In fact, some of them have abandoned the concept of space entirely.
Eventide’s Blackhole creates reverb of theoretically impossible size. Decay times extend to tens of seconds. The tails sound like they come from a space larger than anything that physically exists. And then there is the Gravity parameter. Set it negative and the reverb grows louder over time instead of decaying. It swells. It builds. This is not a room. It is not even a plausible room. It is something that only exists in the digital domain, and that is entirely the point.
Valhalla Shimmer takes a different approach to impossibility. It puts pitch shifting inside the reverb feedback loop, so the tail climbs harmonically as it decays. Every pass through the loop shifts the pitch slightly upward, or downward, and the result is a tail that ascends or descends through the harmonic series as it fades. Sean Costello is explicit about where this came from. He cites Brian Eno and Daniel Lanois’s work in the 1980s as the direct inspiration, those shimmering, slowly evolving textures that appeared on records like The Unforgettable Fire and The Joshua Tree.
Now, Zynaptiq’s Adaptiverb is something else again. It does not simulate a space at all. What it does is analyse the harmonic content of the input signal, strip out the noisy non-harmonic components, and resynthesize the reverb tail entirely from the tonal content of the source. You see, the tail is not the source passed through a room. The tail is made of the source’s own harmonics. The room is built out of the sound itself. On top of that, the Harmonic Contour Filter keeps the tail locked to the tonality of the input or to a key you define, which eliminates the tonal clashing and mud you normally get when a long reverb tail overlaps with a chord change. You can use it as a very long, very smooth reverb that simply refuses to fight with the music underneath it. Or you can push the Richness parameter, add octave and fifth harmonics into the tail, engage Freeze, and you are no longer making reverb. You are making evolving harmonic drones out of whatever sound you feed it.
Accentize’s Chameleon 2 operates on a completely different principle from everything else in this section. It is not a creative tool. It is a matching tool. And for ADR and Foley work, it is one of the most useful things to arrive in post.
The workflow is straightforward. You have a production recording, a location recording with the natural acoustic of the set already embedded in it. You point Chameleon 2 at that recording. The neural network analyses it, separates the direct sound from the reverberant component, and builds a reverb profile from what it finds. The whole process takes a few seconds. You then apply that profile to your dry ADR or Foley recording, and the plugin adds back the room character it extracted from the production sound. You see, what this means in practice is that you no longer need to know what the room was. You do not need a matching impulse response from a library. You do not need to know the decay time, the early reflection pattern, or the frequency balance of the original space. All of that information is already in the production recording. Chameleon 2 reads it directly.
It has been optimised for natural room reverbs rather than artificial reverb. Large algorithmic tails and heavily processed spaces are not where it is strongest. But for the task that matters most in dialogue post like matching ADR to real locations, placing Foley inside real production acoustic environments etc., it does something that would previously have taken a skilled mixer considerable time and care to approximate by hand. And it does it in seconds.
8 Reverb in Film
8.1 The First Principle
Before I go through specific elements, I want to make one thing clear. I used to make this mistake constantly, and the results always suffered.
Reverb is not a corrective tool. It is a spatial tool. When you use reverb to hide a poorly recorded element, to fill empty space in a mix, or to make something sound more impressive than it actually is in context, you create a mix that feels overworked. The audience will not be able to tell you what is wrong. But they will feel it. And the film will feel less real.
Every reverb decision should start with a question. What is the acoustic environment of this scene, and how does this sound element relate to where the listener is implied to be within it? That question has to be answered before you reach for a plugin. Not after. Not even while you are auditioning presets. Before.
And even then, ask yourself something first. Can the spatial quality of this sound be addressed through editing, level automation, or the room character that is already present in the production recording? Because reverb layered on top of existing room character creates a room within a room. You hear two spaces at once, two sets of reflections with different characters and different decay times, neither of them belonging to the same physical environment. It is one of the most immediately identifiable signs of inexperienced post-production work. You hear it and you know, even if you cannot explain why.
8.2 Dialog
Dialogue reverb is the most delicate work in film mixing. The audience is extraordinarily sensitive to the acoustic quality of human voices. Speech comprehension operates below the level of conscious awareness, and it can be broken by surprisingly subtle distortions of vocal clarity. You do not need to make a voice sound obviously wrong for the audience to disengage. A slightly unnatural room quality is enough. They will not know what bothered them. They will just feel that something was off.
To me, the fundamental goal is acoustic continuity. Voices recorded in different acoustic conditions need to feel like they come from the same physical space. This is primarily an ADR matching problem. When the location recording of a scene has a certain room character, every piece of ADR for that scene has to match that character without losing intelligibility. Those are two things pulling in opposite directions, and managing the tension between them is the whole craft of dialogue reverb.
Now, for ADR matching, start with a convolution reverb loaded with an impulse response from the same space as the production recording, or the closest practical approximation. Chameleon 2 or Altiverb’s library covers most scenarios you will encounter. Set the reverb time to match what you hear in the production recording. Keep the pre-delay short, somewhere between 5 and 20 milliseconds. Listen to the production sound carefully. The answer is already in the recording. Remember, your job is to match it.
For exterior dialogue, use very short reverb times, 0.3 to 0.6 seconds, with prominent early reflections representing ground bounce and nearby surfaces. Roll the high frequencies off the reverb output. Outdoor spaces do not produce bright, extended reverb tails. What they produce is a sense of air and distance, with very little tail at all. If your exterior reverb has a tail you can clearly hear, it is too much.
For large interiors, a stone church, a marble lobby, a hospital corridor, longer reverb times of 1.5 to 3 seconds can work. But control the level carefully. The reverb should sound like the room, not like an effect placed on the voice. There is a difference, and the audience will hear it even if they cannot name it. High diffusion settings and control in the low-mid frequency range will help the voice blend naturally into the space rather than sitting in front of it.
8.3 Guns and Weapons
Gunshots are an interesting thing because of the amount of transients and energy it carries. A gunshot in a desert sounds completely different from a gunshot in a small room, a parking structure, a forest, or a marble corridor. The reverb is not incidental to the effect. The reverb is the effect. Get the room wrong and the gun sounds wrong, even if the sound design itself is perfect.
For interior gunshots, use a convolution reverb loaded with an impulse response of the specific interior type. Short reverb times, 0.4 to 1.0 seconds, with a strong initial reflection cluster that drops to a thin late tail. Roll the high frequencies off the reverb output. A reverb tail that rings in the upper midrange turns a gunshot into something metallic and unconvincing. The low end does the work. Let the high end decay and disappear.
For exterior gunshots in large open spaces, forget the dense reverb tail entirely. What you want is early reflections used as delay-based echoes from specific surfaces. Building walls, the ground, nearby hillsides. A series of distinct early reflections at 15, 45, 80, and 140 milliseconds with decreasing levels will sound more like an outdoor space than any amount of late reverb.
For rapid-fire sequences, reduce reverb time and level, or automate the reverb send to duck between shots. Each shot’s reverb tail will overlap with the next shot’s direct sound. If the reverb is too long or too loud, the sequence becomes a wash and individual shots lose their definition. In a rapid-fire sequence, definition is everything. The audience needs to count the shots.
8.4 Explosions
Explosions are a different problem altogether. Their frequency content extends so far into the sub-bass range that the reverb behaviour down there becomes as important as anything happening in the midrange. A distant exterior explosion should produce a deep, lingering low-frequency rumble that you feel before you hear it. A close interior explosion should produce an extremely short, violent burst of reverb with strong low-frequency components that shut off almost immediately.
Now, broadband compression on an explosion is almost always challenging. The sub-bass energy in an explosion is huge relative to everything else. When you put a broadband compressor across it, that low-frequency mass dominates the sidechain, the gain reduction fires on the low end, and it pulls everything else down with it. The midrange detail disappears. The high-frequency crack disappears. What you are left with is a compressed, flattened version of something that should feel violent and uncontrolled.
The answer is multiband processing. Keep the sub-bass band separate and limit it firmly on its own. The mid and high frequencies, which carry the detail, the scale, and the sense of physical force, stay untouched. The low end gets managed without the rest of the explosion paying the price for it.
For distant exterior explosions, use very long pre-delay. 50 to 100 milliseconds, representing the actual time it takes for sound to travel across a large space. Then let a slow-building, long reverb tail follow it. The sense of vastness comes from that gap between the event and its acoustic response. That silence between the flash and the rumble is not empty. It is the size of the space.
8.5 Vehicles
Interior vehicle sounds need reverb that matches the specific acoustic of that vehicle type. And they are not interchangeable. A car interior is a small, heavily damped space with complex reflections from seats, glass, and plastic surfaces at very close distances. A truck cab is larger, with different materials and a different reflection pattern. A bus is different again. These spaces sound different from each other, and the audience knows it even if they have never consciously thought about it.
For interior vehicle dialogue and sounds, use convolution reverb with actual vehicle impulse responses. Altiverb includes car interiors from several vehicle types and it is worth using them rather than approximating with a generic small room. Keep reverb times very short, 0.1 to 0.3 seconds. The seat fabric and soft furnishings in a car interior absorb high frequencies aggressively, so keep the high-frequency content of the reverb moderate.
Exterior vehicle pass-bys should carry essentially no reverb in open environments. In enclosed or partially enclosed spaces, parking structures, urban canyons, tunnels, the space’s acoustic character should be present on everything in the scene simultaneously. The vehicle, the tyre noise, the engine, the Foley. All of it lives in the same space.
8.6 Foley
Foley is where acoustic precision matters most. Footsteps on a hardwood floor in a living room sound completely different from footsteps on hardwood in a concert hall. Same surface material, completely different acoustic. The audience senses that difference immediately and without thinking.
For Foley matching, impulse responses of the actual set, or the closest practical approximation, are the most reliable approach. Pay close attention to the early reflection pattern and the frequency balance of the tail. Stone and concrete have bright, reflective reverb with long tails. Wood has warmer, more complex reflections with a faster initial decay. Fabric-covered rooms are damped and shut down quickly. The material of the surfaces is encoded in the frequency response of the reverberation. You are not just matching the size of the space. You are matching its physical composition.
The automation-first principle applies especially to Foley. A character moving from a large tiled bathroom into a carpeted bedroom should have a reverb change that follows the movement precisely, not approximately. The moment the door closes behind them, the acoustic changes. If your reverb does not change with it, the audience will feel the discontinuity even if they cannot name it.
8.7 Impacts and Fights
Fight impacts need reverb that gives them weight and places them in the space without muddying the clarity of the sequence. A punch in a concrete room should have a short, hard reverb response that cuts off cleanly. A body landing on a floor should produce a brief burst of low-frequency reverb that decays quickly, like something heavy hitting a surface in a real space, not like an effect.
For fight sequences, use a relatively short reverb time, 0.4 to 0.8 seconds for most interiors, with a modest early reflection level. The dry signal should dominate. The reverb is there only to put the impacts in the room. Medium diffusion settings are usually right. High diffusion on fight impacts smears the transients and the sequence loses its physical weight.
For large exterior fights or impacts in open spaces, replace conventional reverb with carefully timed early reflections rather than dense tails. This is the same principle as exterior gunshots. The outdoors does not give you a tail. It gives you echoes off surfaces at specific distances. Use those distances. Make them feel real.
8.8 Ambience and Backgrounds
Ambience beds usually carry reverb information from their recording environments. Adding more reverb on top risks the room-within-a-room quality, two sets of reflections with incompatible characters sitting on top of each other. The goal with ambience is usually to blend it with the other elements of the mix, not to give it a separate acoustic environment it did not have when it was recorded.
For Atmos, ambience beds are typically the element most actively distributed across the soundfield. A forest ambience might have slightly different character in the height channels versus the surround channels, a little more air up top, a little more low-end presence in the surrounds. These differences can be subtle, just EQ and level variations rather than separate reverb treatments. But they contribute to the sense of dimensional space in a way that is felt rather than heard.
9 References
- Schroeder, M.R. – Natural Sounding Artificial Reverberation. JAES vol. 10, pp. 219-223, July 1962. AES E-Library ID 849: https://aes2.org/publications/elibrary-page/?id=849
- Schroeder, M.R. and Logan, B.F. – Colorless Artificial Reverberation. JAES vol. 9, no. 3, pp. 192-197, 1961.
- Gerzon, M.A. – Synthetic Stereo Reverberation. Part 1: Studio Sound vol. 13, pp. 632-635, December 1971. Part 2: Studio Sound vol. 14, pp. 24-28, January 1972. Full bibliography confirmed at: https://www.michaelgerzonphotos.org.uk/appendix1-michael-gerzon.html
- Moorer, J.A. – About This Reverberation Business. Computer Music Journal vol. 3, no. 2, June 1979.
- Stautner, J. and Puckette, M. – Designing Multi-Channel Reverberators. Computer Music Journal vol. 6, no. 1, pp. 52-65, Spring 1982. https://www.ee.columbia.edu/~dpwe/e4896/papers/StautP82-reverb.pdf
- Jot, J.M. and Chaigne, A. – Digital Delay Networks for Designing Artificial Reverberators. Proceedings of the AES 90th Convention, Paris, February 1991.
- Gardner, W.G. – A Realtime Multichannel Room Simulator. Presented at the 124th Meeting of the Acoustical Society of America, New Orleans, November 1992. https://freeverb3vst.osdn.jp/doc/10.1.1.52.7008.pdf
- Dattorro, J. – Effect Design, Part 1: Reverberator and Other Filters. Journal of the Audio Engineering Society vol. 45, no. 9, September 1997. https://ccrma.stanford.edu/~dattorro/EffectDesignPart1.pdf
- Smith, J.O. – Physical Audio Signal Processing. CCRMA Stanford. Free online at: https://ccrma.stanford.edu/~jos/pasp – canonical technical reference for all algorithm diagrams.
- Valimaki, V. et al. – Fifty Years of Artificial Reverberation. IEEE Transactions on Audio, Speech, and Language Processing vol. 20, no. 5, July 2012. https://www.academia.edu/82609908
- Martinez Ramirez, M.A. et al. – Modeling Plate and Spring Reverberation Using a DSP-Informed Deep Neural Network. arXiv:1910.10105, IEEE ICASSP 2019.
- DAFx 2024 – Evaluating Neural Network Architectures for Spring Reverb Emulation. DAFx Conference, Guildford, September 2024. https://dafx.de/paper-archive/2024/papers/DAFx24_paper_77.pdf
- Blesser, B.A. and Bader, K-O. – Electric reverberation apparatus. U.S. Patent 4,181,820, January 1980. Contains the actual algorithm description for the EMT 250.
- EMT 250 Electronic Reverberator Unit instruction manual, after serial no. 162, November 1978. Source for the 19 delay elements specification.
- Moore, C.H. – SST-282 Space Station History (primary source, Moore’s own account): http://www.sevenwoodsdesign.com/SST282_History.htm
- Moore, C.H. – Time-modulated delay system and improved reverberation using same. U.S. Patent 4,264,977, filed 1979.
- Moore, C.H. – Interview in Tape Op Magazine, Issue 65. First-person account of the Space Station design.
- Costello, S. – Stability Through Time Variation: Ursa Major Space Station. Valhalla DSP, 2010. Includes Moore’s comment confirming the account: https://valhalladsp.com/2010/05/14/stability-through-time-variation-ursa-major-space-station
- Griesinger, D. – Practical Processors and Programs for Digital Reverberation. Lexicon, 1989. http://www.davidgriesinger.com/prctpro.pdf
- Griesinger, D. – Creating Reverb Algorithms for Surround Sound. Sound on Sound: https://www.soundonsound.com/people/david-griesinger-lexicon-creating-reverb-algorithms-surround-sound
- Mix Online – 1976 EMT Model 250 Digital Reverb: https://www.mixonline.com/technology/1976-emt-model-250-digital-reverb-377973
- Relab LX480 Manual v1.3: https://relabdevelopment.com/public/manuals/archive/LX480_Manual_v1.3.pdf
- Costello, S. – Getting Started With Reverb Design, Part 2: The Best Papers. Valhalla DSP, 2021: https://valhalladsp.com/2021/09/22/getting-started-with-reverb-design-part-2-the-foundations
- Costello, S. – Schroeder Reverbs: The Forgotten Algorithm. Valhalla DSP, 2009: https://valhalladsp.com/2009/05/30/schroeder-reverbs-the-forgotten-algorithm
- Costello, S. – Reverbs: Diffusion, Allpass Delays, and Metallic Artifacts. Valhalla DSP, 2011: https://valhalladsp.com/2011/01/21/reverbs-diffusion-allpass-delays-and-metallic-artifacts
- LiquidSonics Cinematic Rooms technical documentation: https://www.liquidsonics.com/2020/06/01/introducing-cinematic-rooms
- Sound on Sound review of Cinematic Rooms Professional: https://www.soundonsound.com/reviews/liquidsonics-cinematic-rooms
- Production Expert – Three Reasons Cinematic Rooms Professional Is Loved By Post Professionals: https://www.production-expert.com/production-expert-1/three-reasons-cinematic-rooms-professional-is-loved-by-post-professionals
- MusicTech interview with Michael Carnes, January 2019: https://musictech.com/features/industry-guru-michael-carnes
- Carnes, M. – Forum posts compiled at VI-Control: https://vi-control.net/community/threads/great-info-on-exponential-audio-reverbs.139608
- Acon Digital DeVerberate 3: https://acondigital.com/products/deverberate
- Smith, J.O. – Schroeder Reverberators. CCRMA Stanford: https://ccrma.stanford.edu/~jos/pasp/Schroeder_Reverberators.html – source for Schroeder reverberator block diagram.
- Smith, J.O. – FDN Reverberation. CCRMA Stanford: https://ccrma.stanford.edu/~jos/pasp/FDN_Reverberation.html – source for FDN block diagram, Figure 3.10.
- FDN reference structure (ResearchGate): https://www.researchgate.net/figure/Reference-structure-for-a-feedback-delay-network_fig1_3342318
- Smith, J.O. – Schroeder Allpass Sections. CCRMA Stanford: https://ccrma.stanford.edu/~jos/pasp/Schroeder_Allpass_Sections.html – source for allpass filter signal flow diagram.
- Smith, J.O. – Feedback Comb Filter. CCRMA Stanford: https://ccrma.stanford.edu/~jos/pasp/Feedback_Comb_Filter.html – source for comb filter diagram.
- SST-282 block diagram from service manual: https://archive.org/stream/sm_Space_Station_Service_Manual – page 3 shows the tap and feedback architecture.
