
Today, I am going to mention how we setup our sessions for the mix. First off let me explain how Justin and I look at the mix.
Splitting the Task
On the outset, we decided that Justin would look at the songs and the Background score, while I would take care of the Dialogues and Effects. We would then switch to see if we have ideas on each others work or if something better needs to be done. This is an effective way of working so that the ideas are new and fresh and so is the tonality. But during the mix, since this is a very complex film when it comes to sound and the subtleties, we split the work load with me on the effects and him on dialogues and music and switch to review each other’s ideas. Timing on achieving this is crucial as not all reels are equal in work and we need to complete for the other in time. So, Justin works Day and I get in the evenings and cover up and on the Final Mix, we sit together with Kunal.
Setting up the Session

IO setup Dialogue and Music (Pro Tools HD 11.3.1)

IO Setup FX, Foley and Ambience (Pro Tools HD 12)
Dialogues
These comprised of the Booms, Lapels and multiple MS recordings. There were some techniques we employed for the MS which I will cover in a later post on the premix. I prefer to have the booms on the top followed by the Lapels and then the MS. There is a separator aux that divides this and the ADR. One thing that is also required is the fill track or a mono ambience that is preferably from the location. The Izotope RX4 does an incredible job of generating this from the location tracks. In addition, it is always nice to see the lapels split into characters and the Production Effects (effects that are on the dialogue tracks) split in to another track. This is where Zahir‘s talent comes into play. He was the dialogue editor on Gangs of Wasseypur and also on this. He takes care of the Phase match between the different mics and also matches the ADR very closely which I then only have to polish off in the mix.
There are 10 object tracks created for this so we have a resolution in pans when it is done across the surrounds or screen. (Oh yes, you can pan dialogues into the surrounds in Dolby Atmos. No exit sign effect!) The reverbs are set up as a 7.1 and a stereo Overhead. I am using Phoenixverb Surround from Exponential Audio for this. These are brilliantly designed reverbs with a very smooth tone for dialogues and score. One clever thing this has is a 3D link that can link the beds and overheads to create a very realistic 3D space. More on that later. I then have a VCA master for the Beds and Objects. All of this is taken care of by Sarath Mohan who is brilliant in setting up these things.
Effects, Foley and Ambience
The setup for these is pretty similar to the dialogues, but on a different machine. One change here is the use of the SDDS and HD 7.1 combination I mentioned here. This is employed in the Effects and Ambience routings. Again the reverbs and the Masters are set in the same way as the above. I prefer to have the foley on top, followed by its auxiliary, the Effects and then the Ambience. I leave my VCA masters on the top of the session marked by a vFX, vAmb and vFoley. The reason is that we are using a Pro Tools S3 on the Effects machine and it is a bit easier for me to do the rides when things get crucial. I also have Spanner on all the beds as it has become an indispensable tool for the mix.
Music and Songs
One of the challenges we have is fitting everything into a master session. So, the Music is split into different 7.1 stems and the corresponding objects. The beds are then recorded with split reverbs and imported into the master session with all the raw tracks deactivated and hidden. We then have a window config that allows us to go into the BGM or Dialogues if we need to fix something in the recording. The good thing is that we dont leave the session to do this. Spanner is again a tool here to fit the music in the space. Another reason we did this is because we are using a lot of analog emulation for the Dialogues and effects. Not something that would be standing out, but for the warmth and to match the look and feel of the movie. We went through a lot of plugins to fix in on some very cool ones. I also took some help from Farhad Dadyburjor who in my opinion is an encyclopaedia on this!
The Master Session
The Master session for the Effects machine doesnt change but the one on the Dialogue and Music has a difference where they are combined and an additional set of 64 auxes are created to send the signal from the Effects machine to the RMU as in the earlier blog post I mentioned about the signal flow.
Defaulting the Dolby Atmos Plugin
One issue I have with the Dolby Atmos panner plugin is that when we instantiate it, the panner comes up like this.

Dolby Atmos Default
The issue here is that the pan position is in the center of the room which isnt a very good place to start. If we are used to the Pro Tools Panner, then it becomes a challenge. But like all good things, Pro Tools allows us to use our own setting as a default while loading. This is how it is done.
Load a stereo instance of the plugin on to a track and set the Y to 100. This makes the plugin look like this.

Atmos Stereo Default
To make this load as a default, all we have to do is save this as something. I saved this preset as Front Default Stereo as you can see above. Then there are 2 steps to do.
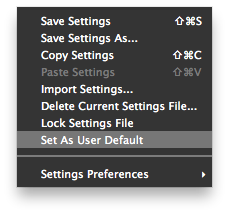
Set as User Default

Set load User Default
Once you do both of these, what it does is essentially make this as a default setting while loading. The reason you have to do this on a stereo file is if you do it on a mono, the right channel on the stereo version of the plugin will default to the first picture. Once you do this, then things are smooth to go.
You can also use the above technique for any plugin not just the panner.
Till next time, share this post and enjoy!
-FM
