
Tags
While there is some time left before the mix of Bombay Velvet starts, I thought it would be useful to talk about the format. This would make it easier for you to follow what I write in terms of techniques later and how the movie is mixed. This will also help understand why we decided to do this film in this format as that was a very important decision to make. I must also warn you. This is also the reason why this post will be a bit longer.
Before Dolby Atmos
Traditionally, mixes were done in 5.1 for a very long time. (I am not going into Mono mixes as that is mostly irrelevant today unless a creative technique.) This means that the speakers we had were Left, Center, Right, Left Surround, Right Surround and Low Frequency Elements. This is usually abbreviated as L, C, R, Ls, Rs, LFE. Within Pro Tools, the Pan position is as shown in the figure below.
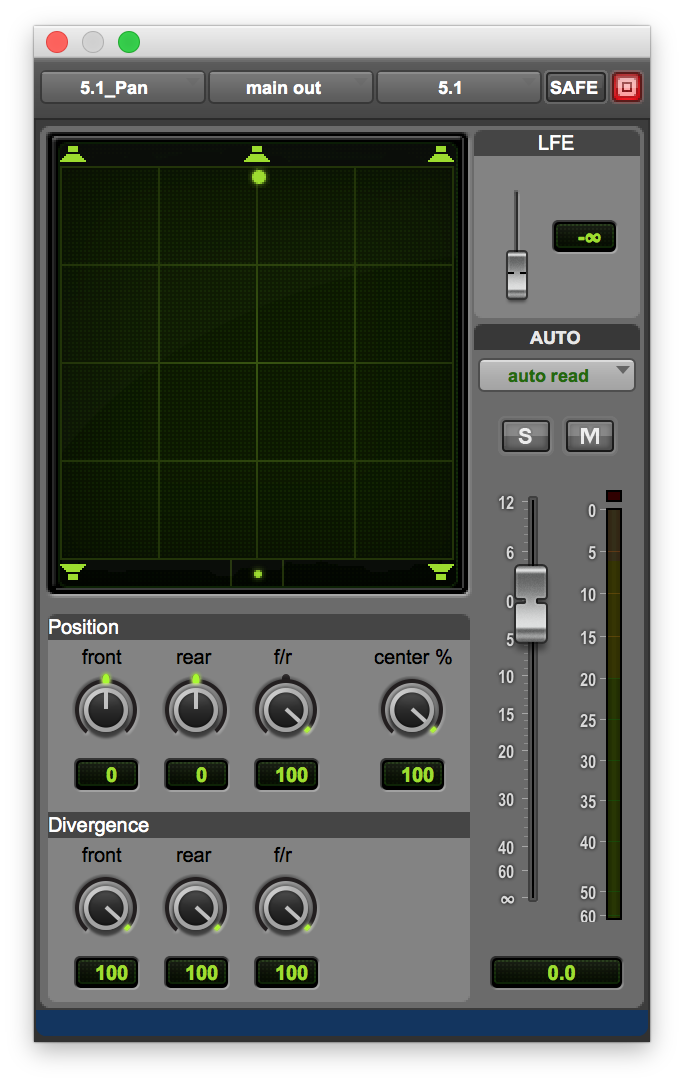
5.1 Sound Field
You can see the speaker positions in the above figure. The little dot is what we use to position the sound in the field. But in the theater, this is not as simple as this. The Surrounds are actually an array of speakers. So, although in the above picture the surrounds are a point source, in the theater, this is actually not. One of the things to get your head around initially is also the position and the sound in the theater. For example, if you pan the dot to the speaker in the Right Surround, the sound in the theater would come from the array on the right and not exactly the back.
This was a print and a digital format and the sound field was the same in DTS too. Then followed a digital format called 7.1. This was not available in the print format and so was very popular with Digital Cinema. This is different from the SDDS format as it splits the surrounds into 4 zones, namely Left Side Surround, Left Rear Surround, Right Side Surround, and Right Rear Surround. These are abbreviated as Lss, Rss, Lsr, Rsr.
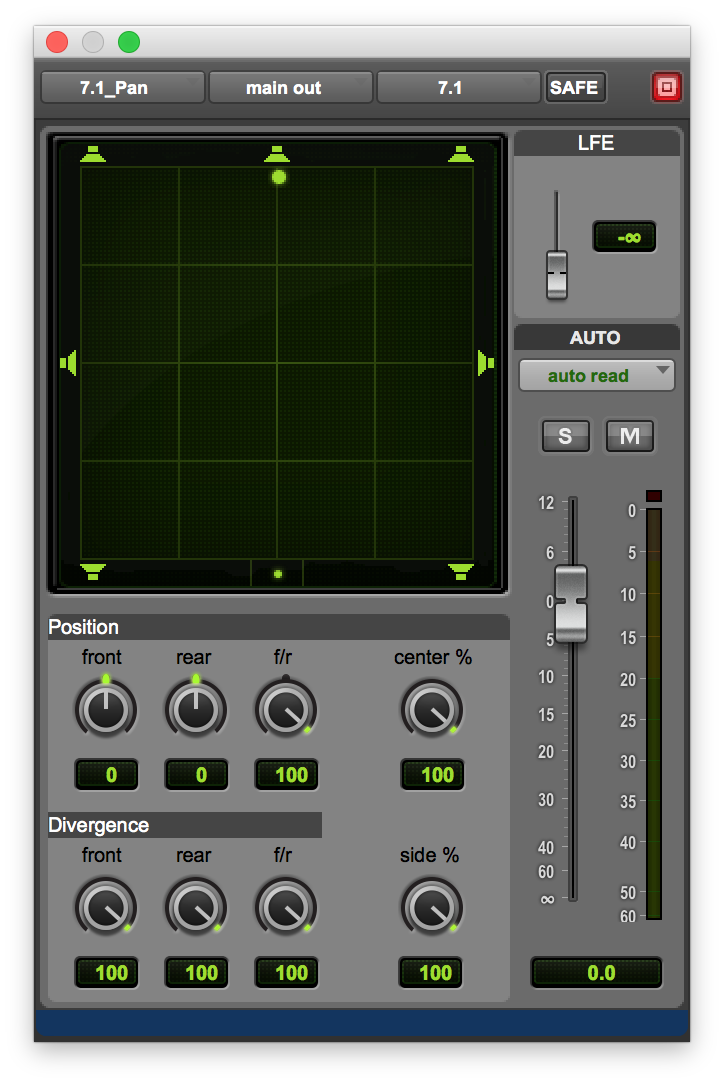
7.1 Sound Field
This actually was a format adapted from the 7.1 HD made initially for broadcast and home entertainment. Now, as mixers we quickly realised that if the pans were bought beyond the middle like that crosses the side surrounds, that would mean the sound would be taken off from the stage (L, C, R). The problem this bought about was that usually in the theaters, the number of speakers for the rear surround are lesser than the side surrounds. (They are calibrated to be exact in terms of loudness though.) But for the audience, this would take attention away from the front and would be direct sounds to the ears. So, some amount of getting used to was required for us although that wasnt really a long period.

Dolby Digital on Print. You can see the Double D logo in the middle.
Dolby Atmos
One of the challenges in the above configuration was that the screen speakers were calibrated to 85 dB SPL and the surrounds to 82.
Originally with Dolby Stereo the mono surrounds were set to 85dBc, to match each of the screen channels. With the introduction of split surrounds, each array was then calibrated to 82dBc due to average 3dB acoustic summation between the arrays, this means that a common signal sent to both channels will give an equivalent monitoring level of the mono surround for compatibility. With the introduction of Atmos, Dolby decided that Lt-Rt compatibility is less important (i.e. can be performed using fixed level offsets), and that it makes sense for all channels to monitor at the same level hence they made the change to 85dBc for each surround bed.
This means that each array in Atmos is now calibrated to 85 dB and also that each speaker in the surround is Full Range as they have additional Subwoofers in the surrounds that bass manage the low frequency in an intelligent way.
The real advantage with Atmos is 3D audio or Immersive audio. If you think about it, sound was always in 2 dimensions. You could represent it on a paper or a pan pot as above. Sound always was on a horizontal plane. Dolby Atmos made it possible to make sound 3D. They introduced an over head array of speakers. Thus, the whole sound format basically starts with Left, Center, Right, Left Side Surround, Right Side Surround, Left Rear Surround, Right Rear Surround, Left Overhead, Right Overhead and the LFE. This is called a 9.1 Array. (9 mains and one subwoofer)
Speaker Placement in Atmos
The whole format of Atmos consists of 10 tracks of Beds (9.1) and 118 tracks of Objects that are fed into a unit from Dolby called the Rendering Mastering Unit or RMU. These require 2 MADI cards as there is a total of 128 inputs to it. This means the Pro Tools system would be an HDX2 system.

Signal Flow in Atmos
The output of the RMU is a total of 64. This means the maximum number of speakers that can be addressed in the theater is 64. So, input is 128, output is upto 64. That being said, the number of speakers in a theater depends on the size of the theater. They can go anywhere from 16 to 64. The beauty in this is that the format is scalable. Which means a sound placed 1/3rd between the screen and back wall will be 1/3rd from the screen to back wall irrespective of the size of the room. (Eg, if the length is 3 meters in the mix room, it will be at 1 meter. If the Hall it is playing back is 6 meters long, the sound will be reproduced at 2 meters, thus keeping the ratio.) The geography will be accurately maintained for anyone watching the movie.

Atmos Monitor Path. The blue line is for traditional Mixes.
There is another concept that needs to be understood with Dolby Atmos.
About Bed and Objects
The 9.1 configuration I mentioned earlier is called a bed. A bed is essentially a part of the mix that is played through an array speaker. In music it would be something like a Pad or strings etc. In Effects, it will be ambience like the wind or general traffic etc. And in general Reverbs are beds too. Keep in mind that this is just to explain and as with sound, there are no rules!
The other very distinguishing feature is Objects. These are very specific point sources or sounds. For example a car pass or a single bird, etc. The speciality of an Object versus a bed is that the object if panned from front to the back along the right surround will pan through each individual speaker in the path. This means the precision offered in the pan or the resolution is extremely high. A proper mix of the Beds and Objects would make for a very immersive mix.

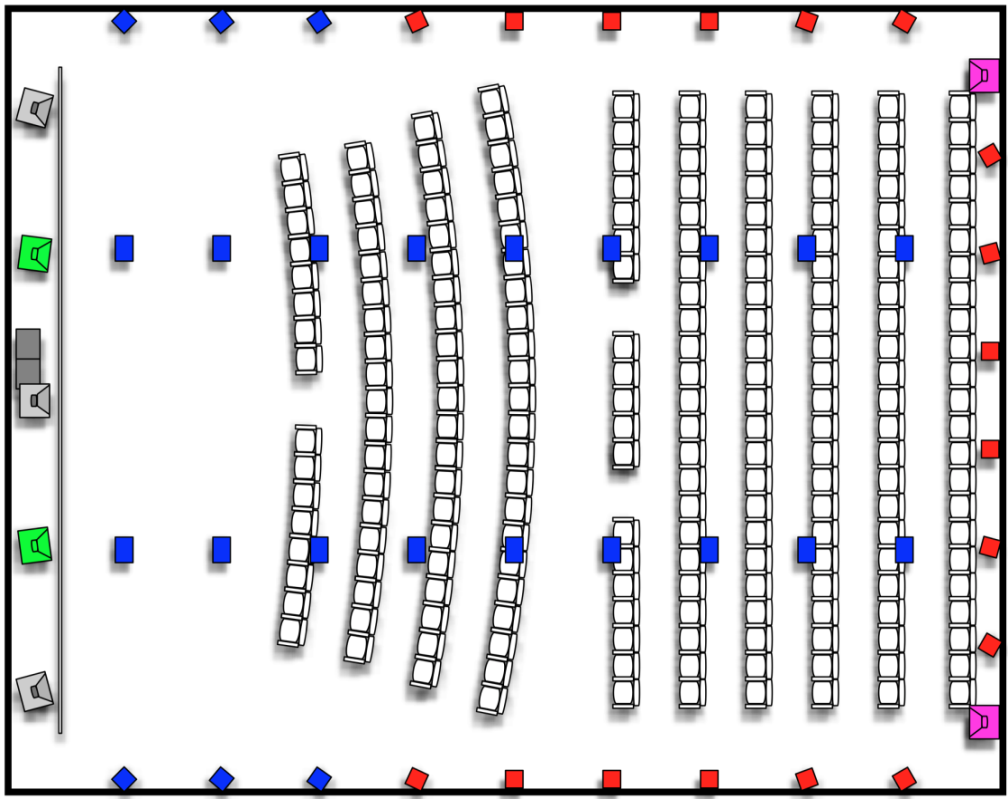
Atmos Monitor and Speaker placements
The objects can be used for pans and for static placements. So if there is a restaurant scene and you want to place some cutlery sounds in a very specific speaker, you can do that too, thus making for a very realistic space. If you look at the above figure, all the speakers are part of the objects and beds, but the blue in the left surround and right surround are exclusive objects. So is the case for the two green speakers inside the screen which can be called as Left Center and Right Center. This is present in Rajkamal, where we are mixing the movie.
Handling Objects
Now, we know that the main difference between Atmos and traditional mixing is the resolution in the Pans, there is an obvious question. How are they panned? This is where the Atmos Panner plugin comes in play.
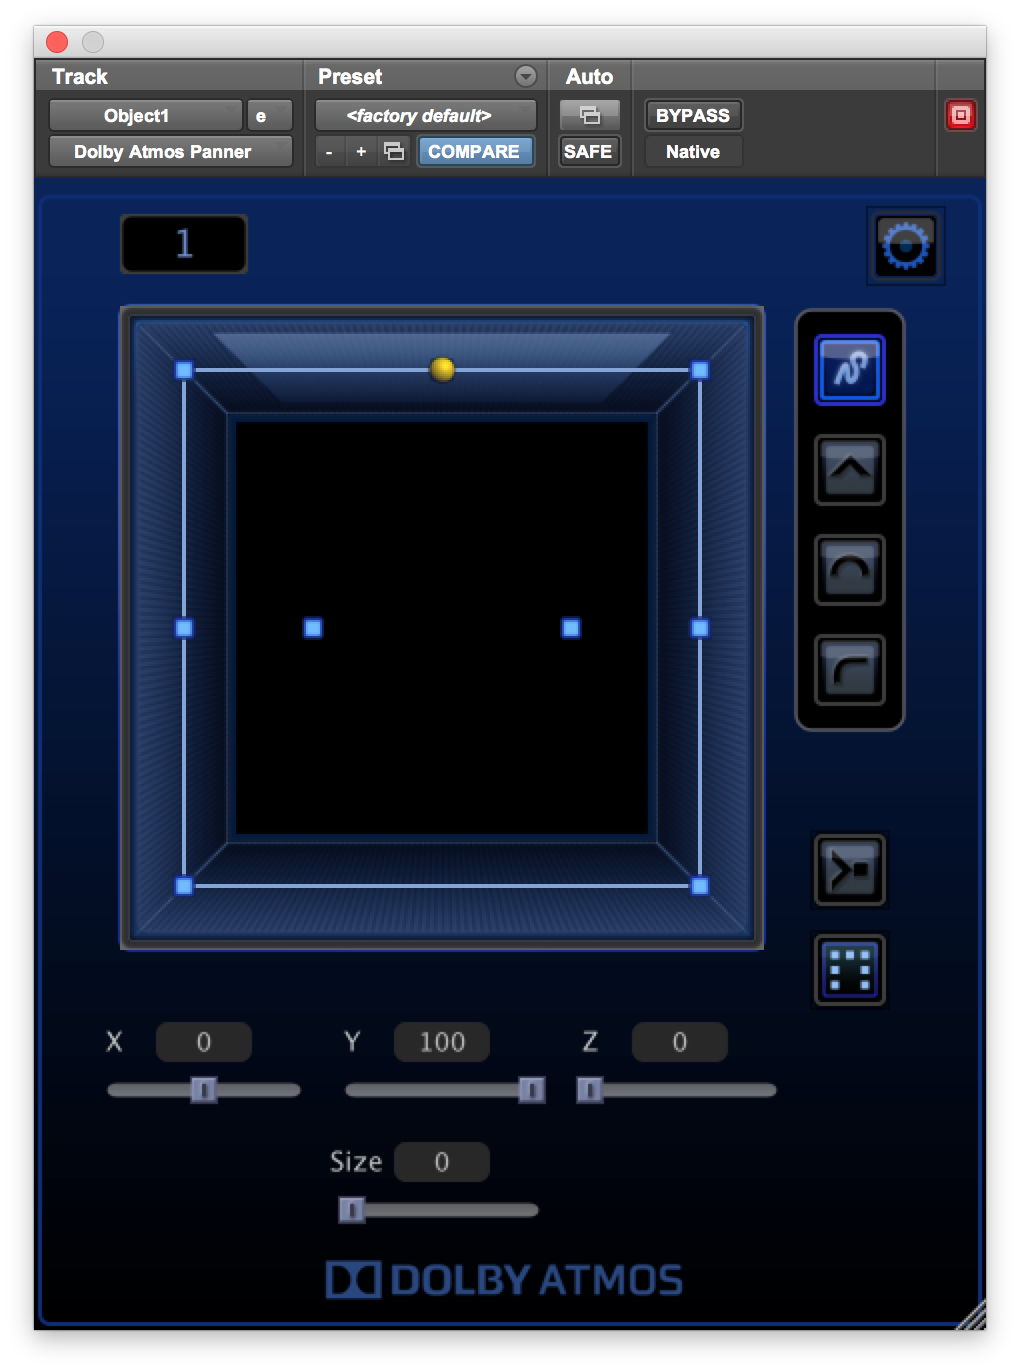
Dolby Atmos Panner
If you look at the panner above, you will see the squares that represent the areas in the theater. One very important thing to note is that they are not shown as speakers but rather as indications of the borders of the room. This means that this format allows you to mix to Space rather than Speakers and this is a very important distinction. So while mixing it is much more easy to create a real word space. The two dots in the middle of the square are the overhead section. If you see, there is a number designated as 1. This means this panner is controlling object number 1, which comes from MADI no 11. (the first 10 are beds remember?). How is this transmitted?
The Pro Tools system is connected to the RMU via an ethernet cable. This pan data is sent to the RMU as Metadata and it associates this with the track in it is recording. There are a few options on the panner itself which I wont go into a lot detail as that is related to panning. The main parameters are X, Y and Z which are self explanatory on the position. The Size is kind of like Divergence in Pro Tools. The below figure is like a Pro Tools version of how the RMU records Data. This is just for explanation, although the RMU does it in a far more sophisticated manner.

RMU in Pro Tools Language
Backwards Compatibility
Not all theaters are Atmos. What happens in a regular theater? This is the ultimate strength of Atmos. The advanced algorithms in the RMU make a fantastic downmix of the Atmos mix. In addition, because we have the overheads and the objects, as mixers, we would do pans and balances much different and in my opinion more bold in pans and positioning. This gives a very different mix than if we had a traditional mix.
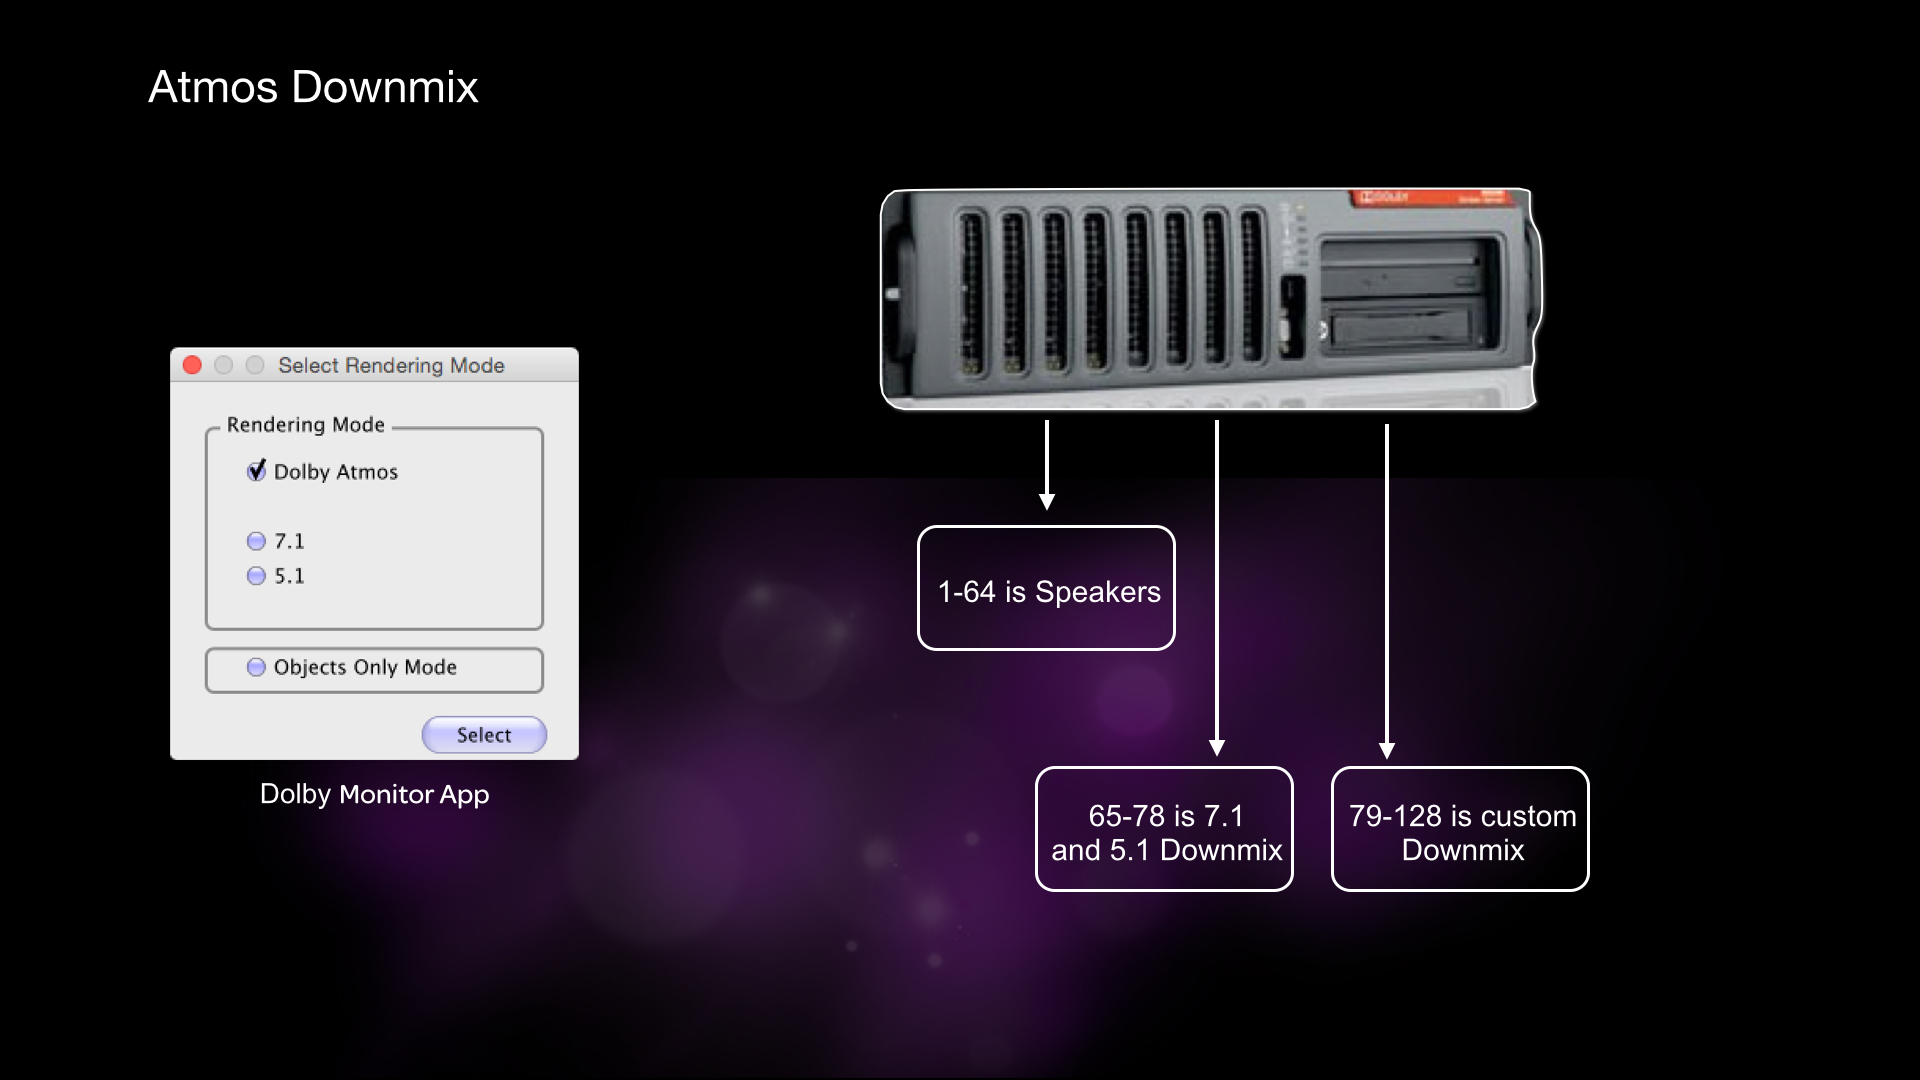
Atmos Downmix
Sound Editing for Atmos
One fantastic tool that Dolby makes is something called the Local Renderer. What this is is essentially a software version of the RMU that runs in the background as a service with only its rendering capability. So, any sound editor or designer while doing the tracklay can make the tracks and pans using the Atmos Panner itself but without needing the RMU. (Remember, the RMU is a must for Mastering and in the Mix room.) After a preliminary discussion with the Mixer on the Object number that would be for FX, Ambience, Foley etc, the sound editor can then make a session that would match this in the mix. This is installed on the system where the sound edit is happening.
Basically, there are 2 plugins that are additionally installed while installing the Local Renderer. These are the Local Renderer Input and Local Renderer Output. The plugins do what is said. Send to the Renderer (input) and receive mix from the renderer (output). The Local renderer can support upto 16 speakers. So you would be needing an HD IO 16×16. Logically, this is how the Pro Tools session would look like in the sound editors room.
The input to the Local Renderer is via the Renderer Input plugin which is inserted on an Aux as shown below. This plugin has different modes which can be set in the source type within the plugin, for beds and objects.
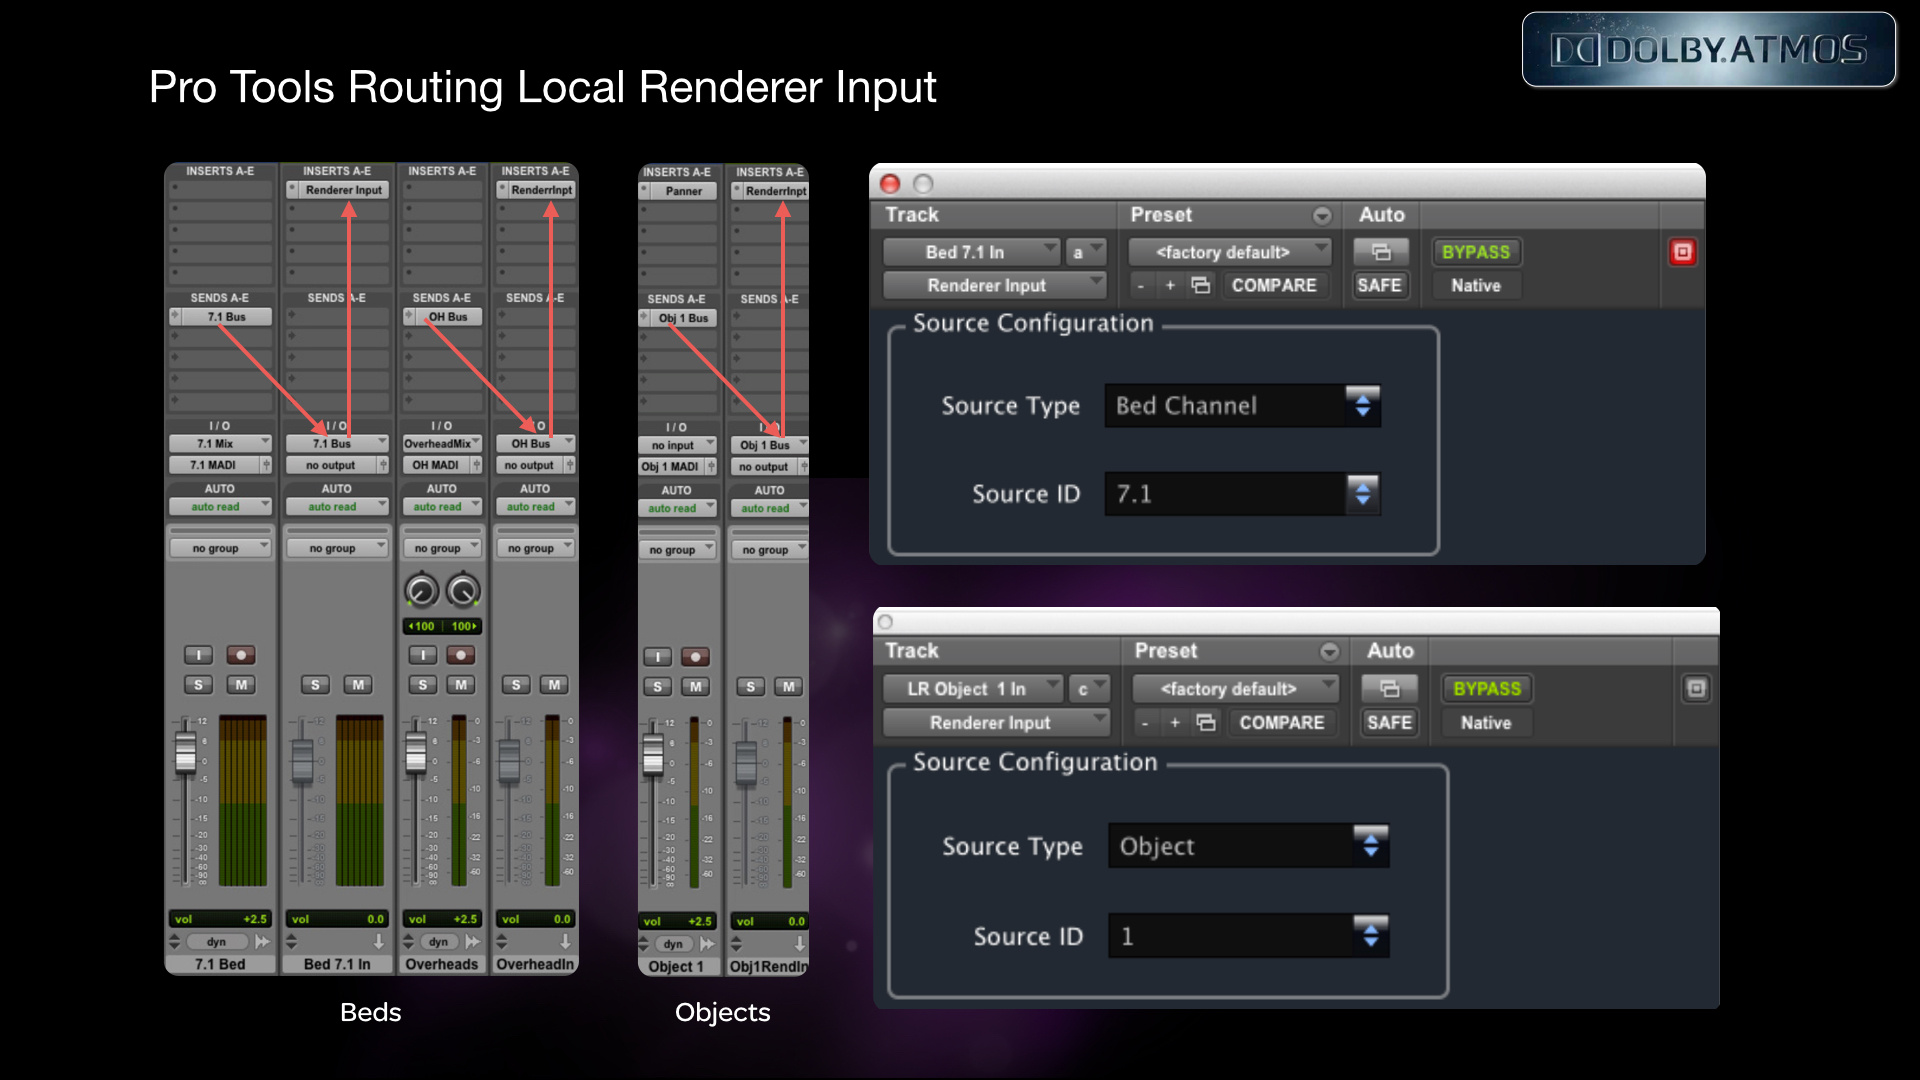
Local Renderer Input
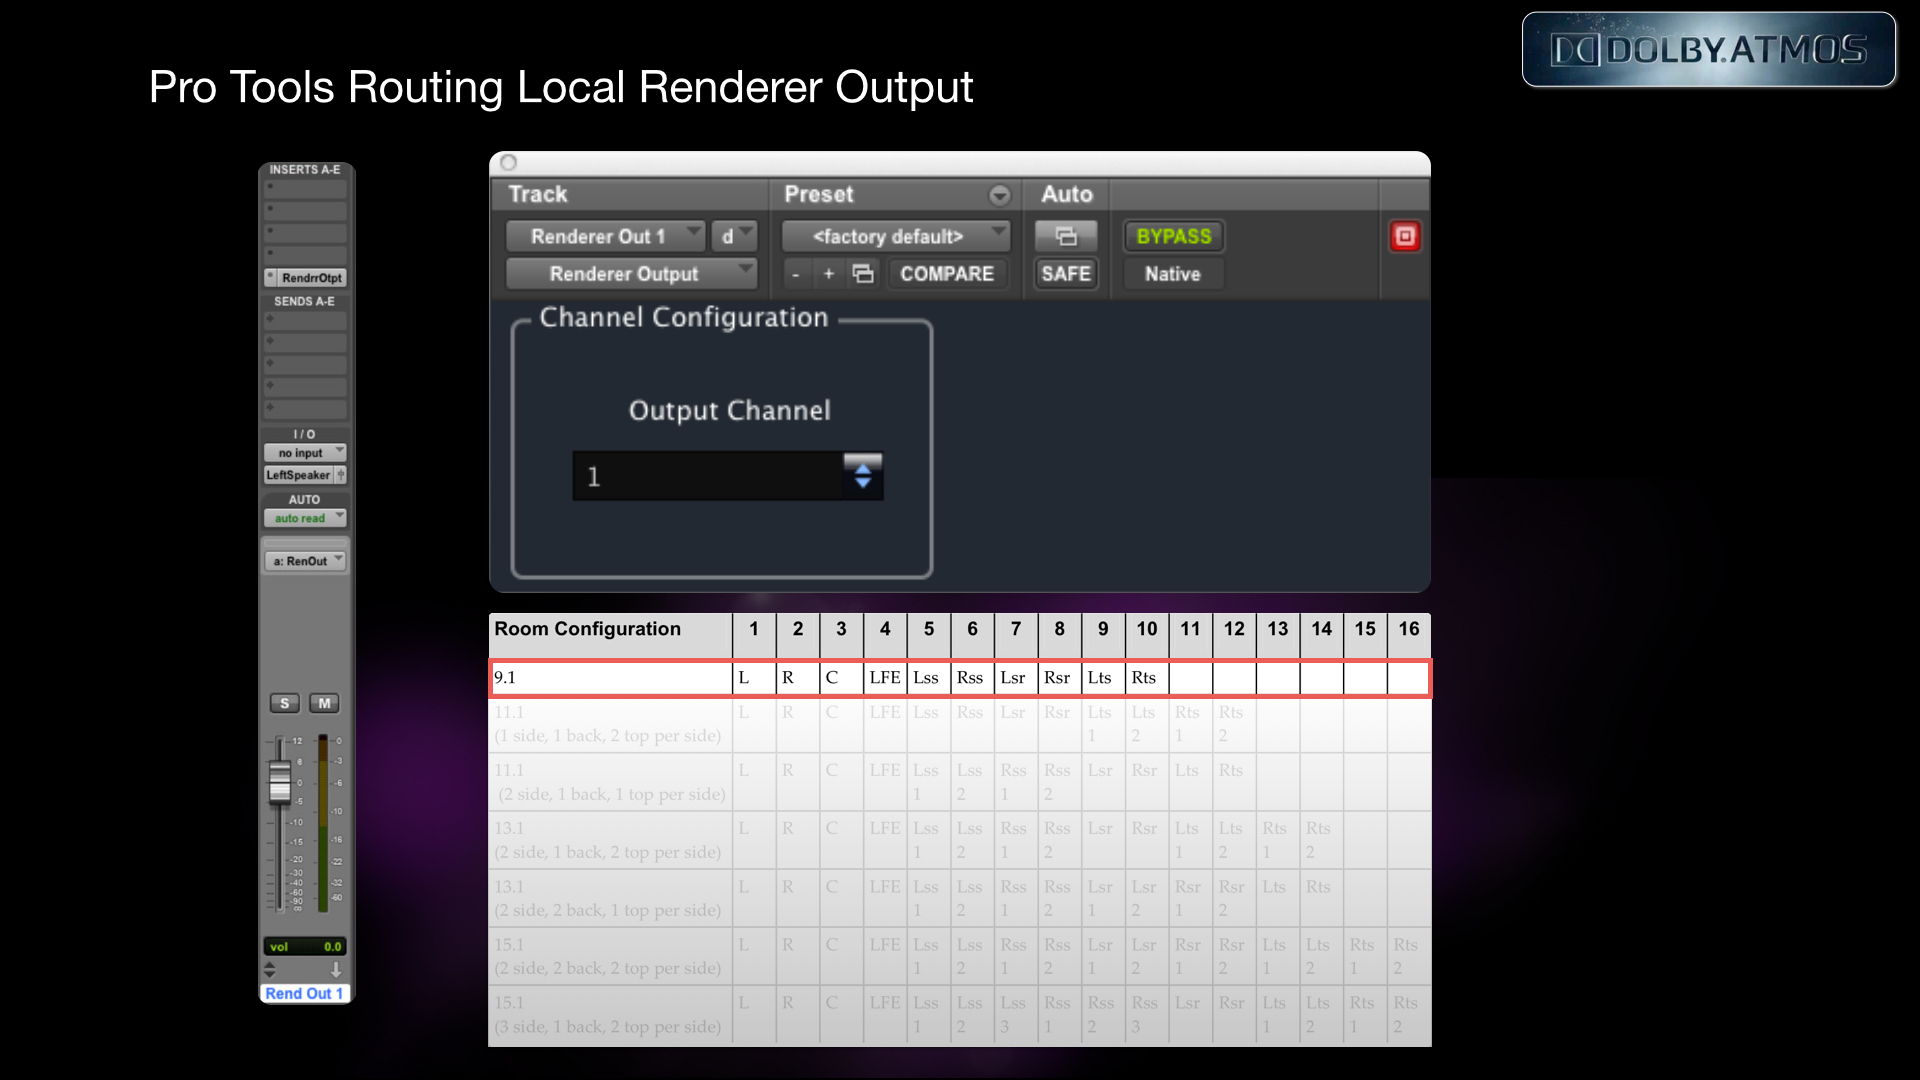
Local Renderer Output
The Return from the Local Renderer is taken into an Aux that can be sent to a speaker as in the number shown above. So, 1 will be Left, 2 will be right, 3 will be Center etc upto a maximum of 16. The advantage with this method of routings is that since the sends to the Local Renderer are from a track via a Bus, this session can be opened in a mix stage and if needed sent back to the edit stage for correction without change in output routings. If you look at the Local Renderer Input Figure, you would see that the Object 1 is routed to MADI and also there is a send on Object 1 Bus to an Aux. Since this MADI isnt available in the Edit room, it would be greyed out and the Aux would be functional in sending the output to the Local Renderer. When in Mix stage, the AUX would not be functional as the MADI output is present. (It takes a few reads to understand that!)

Local Renderer Signal Flow. The Red box is indicative of internal Processing.
I know this has been a long read and if you have made it to this point, I am thankful and appreciative of the fact that you managed. But this foundation is essential as later I would go into Session Preparation and the actual mix where these things are important to know. Do ask if there are questions and I will try my best to answer.
Till next time, have fun!
-FM

Since these are some of the few instances where the entire Sound crew had been involved in the whole process right from the Pre-Production stage, hoping to hear about the interactions and planning that went on till the mix stage, as well.
Regards
-HD
Pingback: Bombay Velvet – Session and Routing Techniques | Film Mixing and Sound design
all the best to the sound team
Thanks Anthony!
Pingback: Bombay Velvet – Dolby it Atmos Mastering | Film Mixing and Sound design
Pingback: Demystifying the Myths of Dolby Atmos | Film Mixing and Sound design
The pdf is superbly written and so are all your explanations of Atmos. Thanks very much.
Thanks a lot.